
by Michael Blume
| University of Bielefeld - Faculty of technology | |
|---|---|
|
Networks and distributed Systems
Research group of Prof. Peter B. Ladkin, Ph.D. |
|
| Back to Abstracts of References and Incidents | Back to Root |
|
|
|
|---|---|
| p01.html | Table of Contents |
| p02.html | Preface |
| p1-10.htm | Page 1-10 (Section 1, Subsection 1.5. (15.1-15.23)) |
| p11-20.htm | Page 11-20 (Section 1, Subsection 1.5 -1.7 (15.24-17.233)) |
| p20-3 | Page 20-30 (Section 1, Subsection 1.7 (17.233-17.332.4)) |
| p31-4.htm | Page 31-40 (Section 1, Subsection 1.8-1.9 (18.1-19.231)) |
| p41-5.htm | Page 41-50 (Section 1, Subsection 1.9-1.11 (19.232-111.432)) |
| p51-6.htm | Page 51-60 (Section 1, Subsection 1.11-1.13 (111.5-113.22)) |
| p61-7.htm | Page 61-70 (Section 1, Subsection 1.13-1.15 (113.22-115.0)) |
| p71-8.htm | Page 71-80 (Section 1, Subsection 1.16-1.17 (116.1-117.112)) |
| p81-90.htm | Page 81-90 (Section 1, Subsection 1.17 (117.12-117.325)) |
| p91-100.htm | Page 91-100 (Section 1 , Subsection 1.7 (117.326-117.343.3)) |
| p101-110.htm | Page 101-110 (Section 1 , Subsection 1.7 (117.4-17.542)) |
| p111-120.htm | Page 111-120 (Section 1, Subsection 1.17 (17.55-117.922)) |
| p121-130.htm | Page 121-130 (Section 1, Subsection 1.17-1.18 (117.923-118.143)) |
| p131-140.htm | Page 131-140 (Section 1 , Subsection 1.18 (118.143-118.321)) |
| p141-165nn.htm | Page 141-163 (Section 1, Subsection 1.18-1.20 (118.322-120.7)) |
| p165-170.htm | Page 165-170 (Section 2, Subsection 2.1 (21.1-21.2)) |
| p171-180.htm | Page 171-180 (Section 2 , Subsection 2.1 (21.211-21.222)) |
| p181-188.htm | Page 181-188 (Section 2, Subsection 2.1 (21.222-21.53)) |
| p189-210n.htm | Page 189-210 (Section 2, Subsection 2.1-2.2 (21.53-22.332)) |
| p211-230n.htm | Page 211-230 (Section 2, Subsection 2.2 (22.334-22.43)) |
| p231-250n.htm | Page 231-250 (Section 2, Subsection 2.2 (22.5-22.633)) |
| p251-270n.htm | Page 251-270 (Section 2, Subsection 2.2-2.3 (22.634-23.322)) |
| p271-295n.htm | Page 271-295 (Section 2-3, Subsection 2.3-3.1 (23.33-3.1)) |
| p296-325n.htm | Page 296-325 (Section 3-4, Subsection 3.2-4.6 (3.2-46.1)) |
| p326-332.html | Page 326-332 (Section 4 , Subsection 4.6-4.8 (46.1-48.2)) |
|
|
|
|---|---|
| p334Anex.html | Page 334ff (List of Appendix, Begin of Appendix 0) |
| A1_1_1024.jpg | Appendix 1: Map of the impact area (Part 1) |
| A1_2_1024.jpg | Appendix 1: Map of the impact area (Part 2) |
| Sorry | Appendix 2: The topographic map -should be digitised (bad copy) |
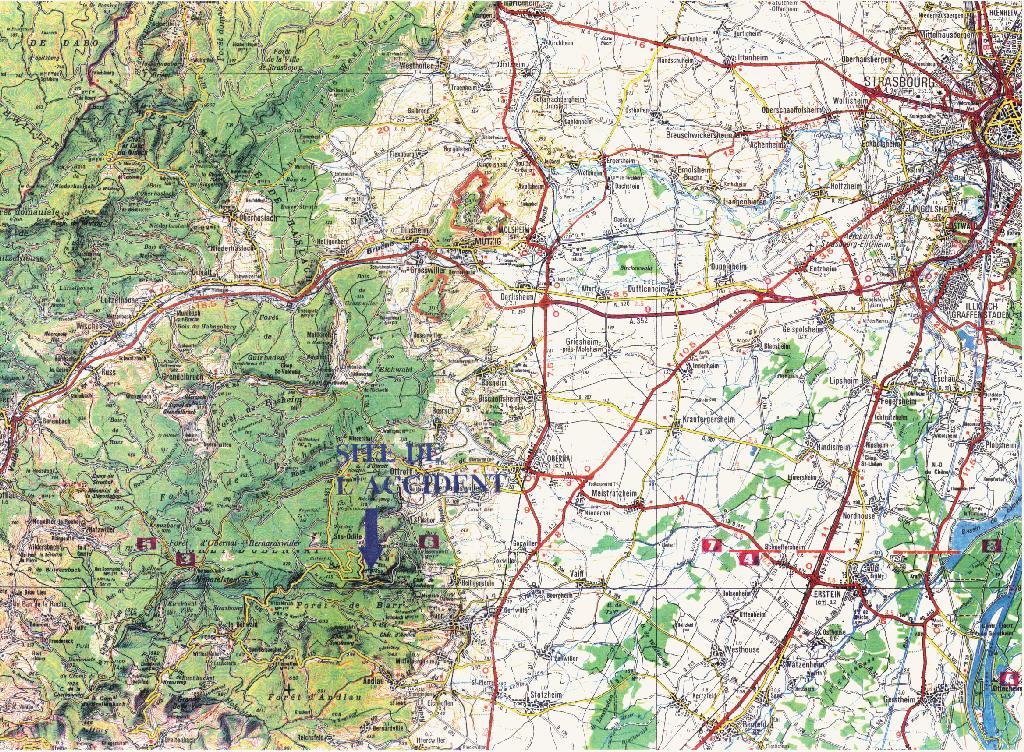
| a3.jpg | Appendix 3: Map of the place where the main parts of the airplane had been found. |
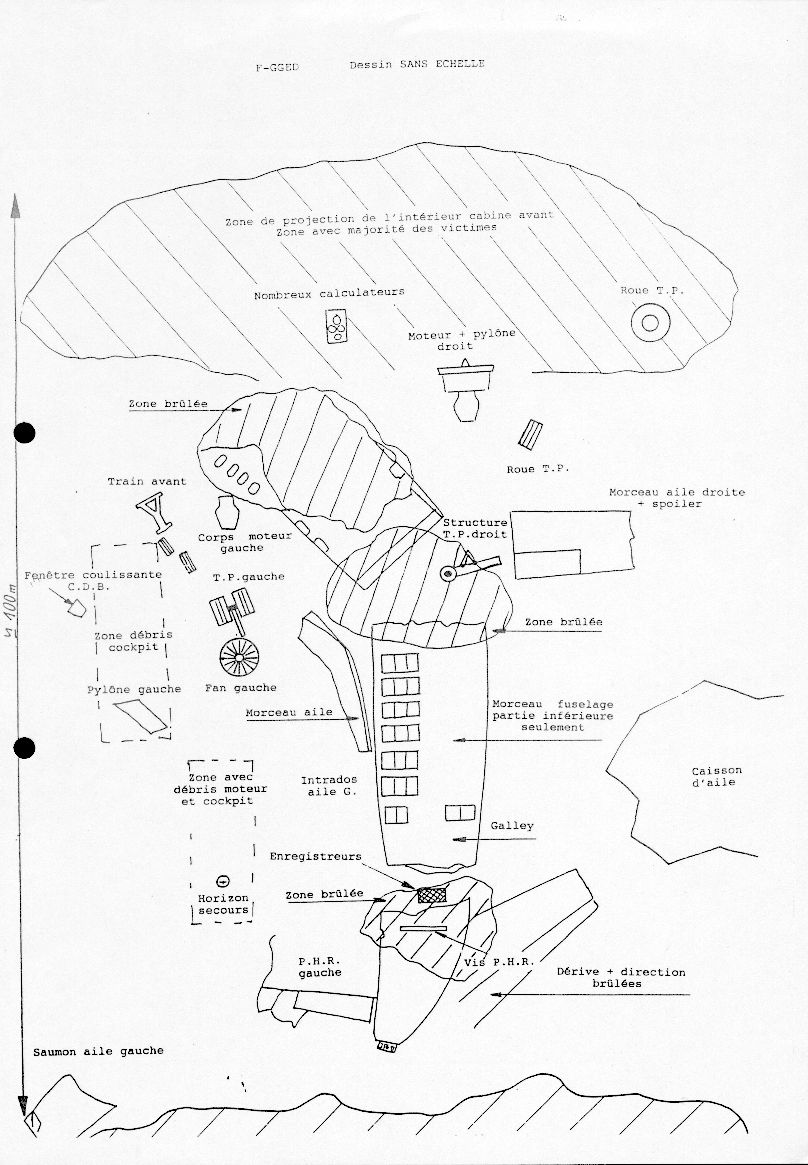
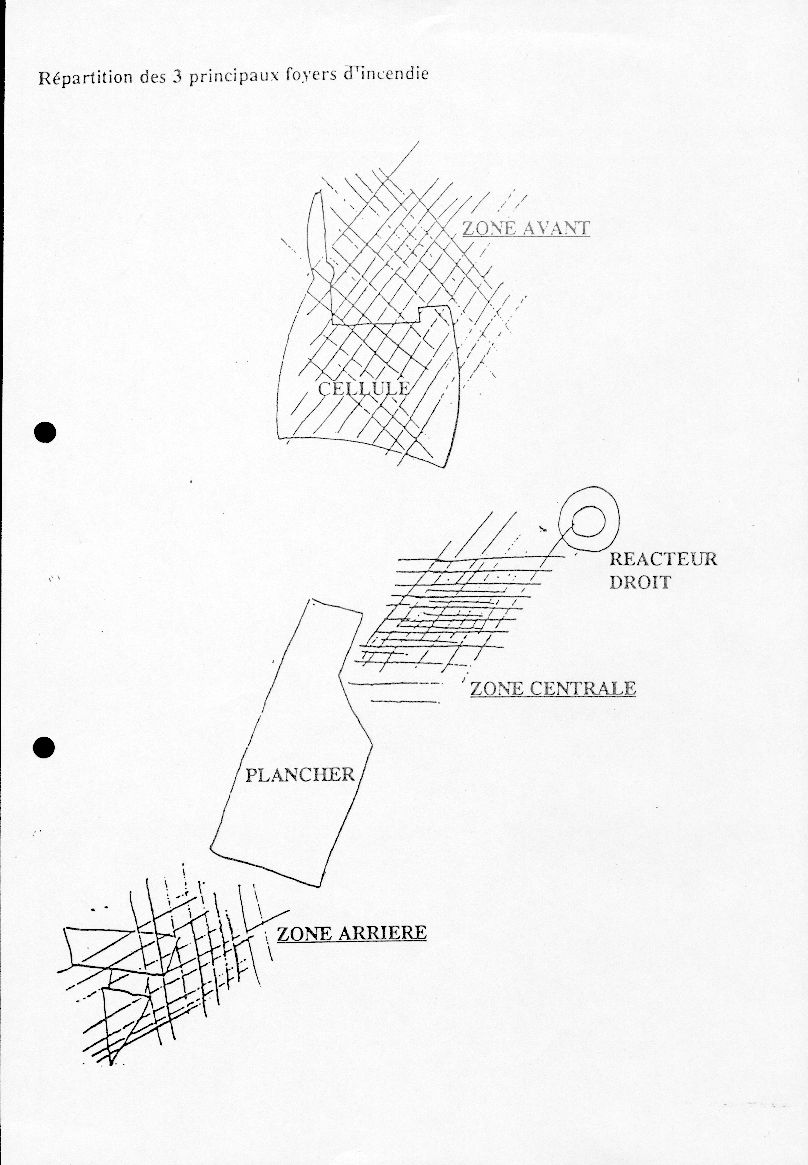
| a4.jpg | Appendix 4: Map of the place where the wrecklage of the airplane had been found. |
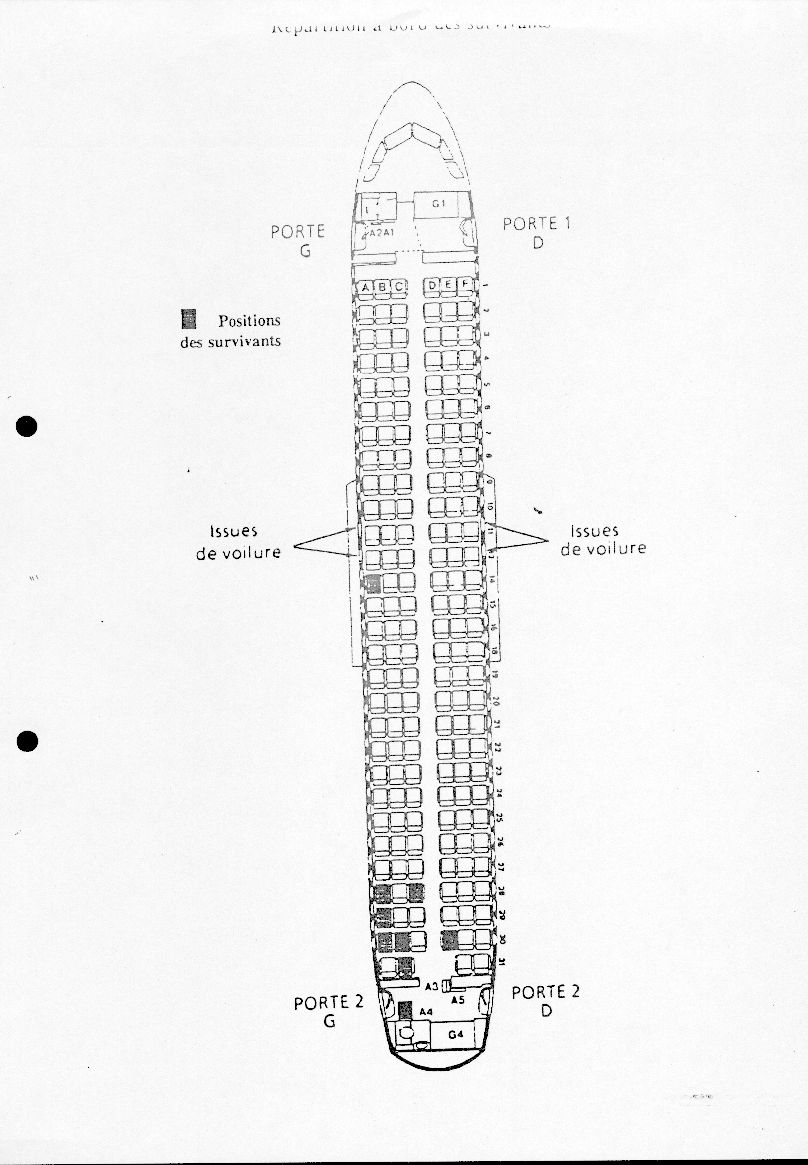
| a5.jpg | Appendix 5: Diagram of the survivor's seats in the airplane. |
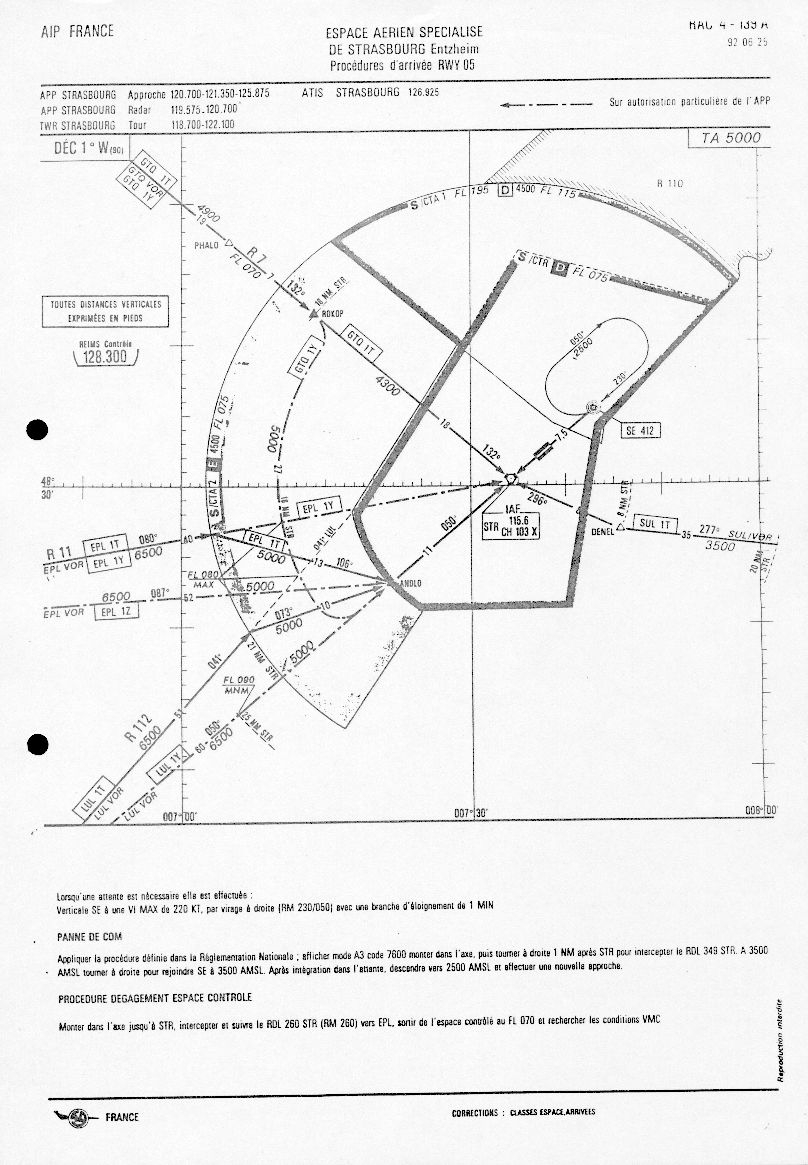
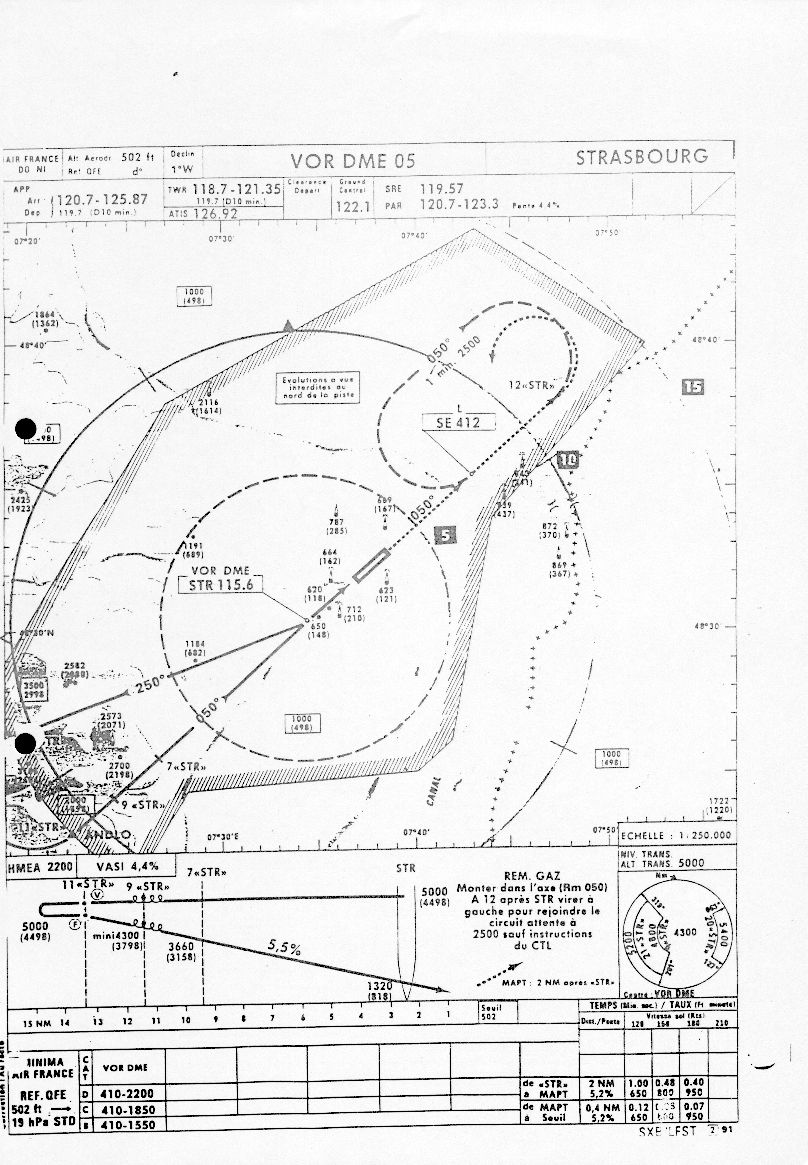
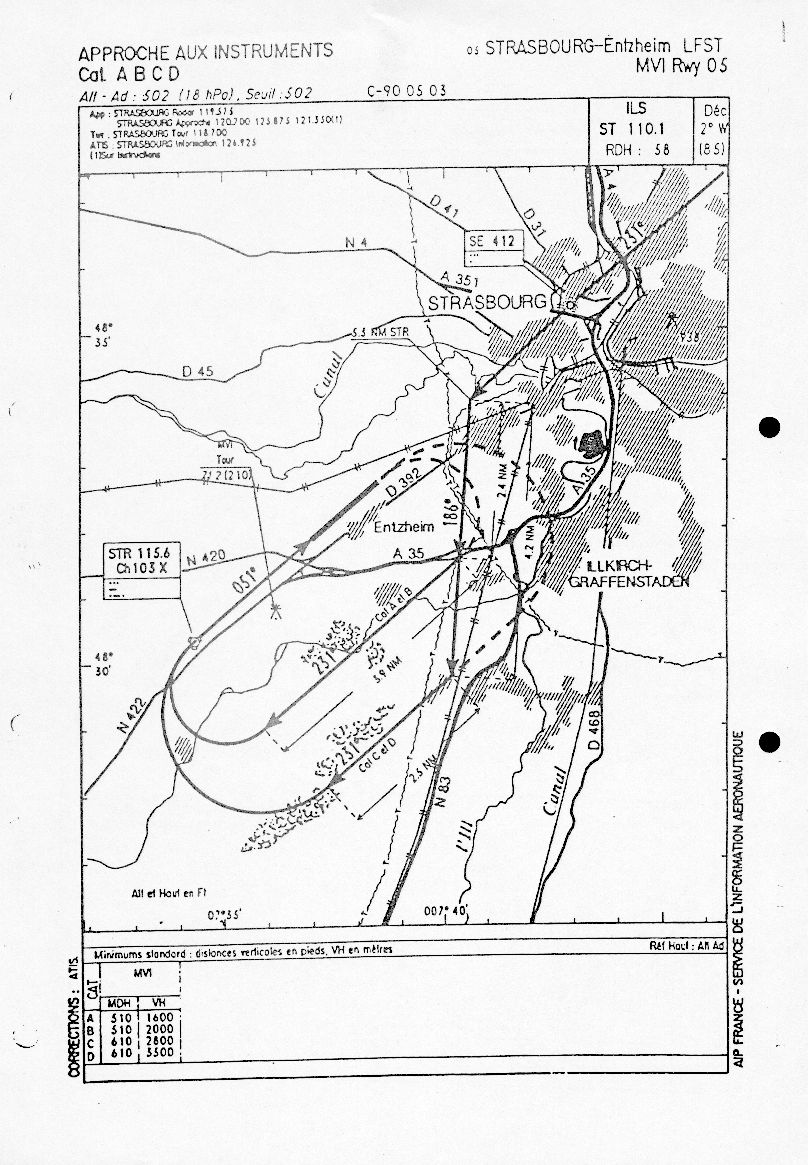
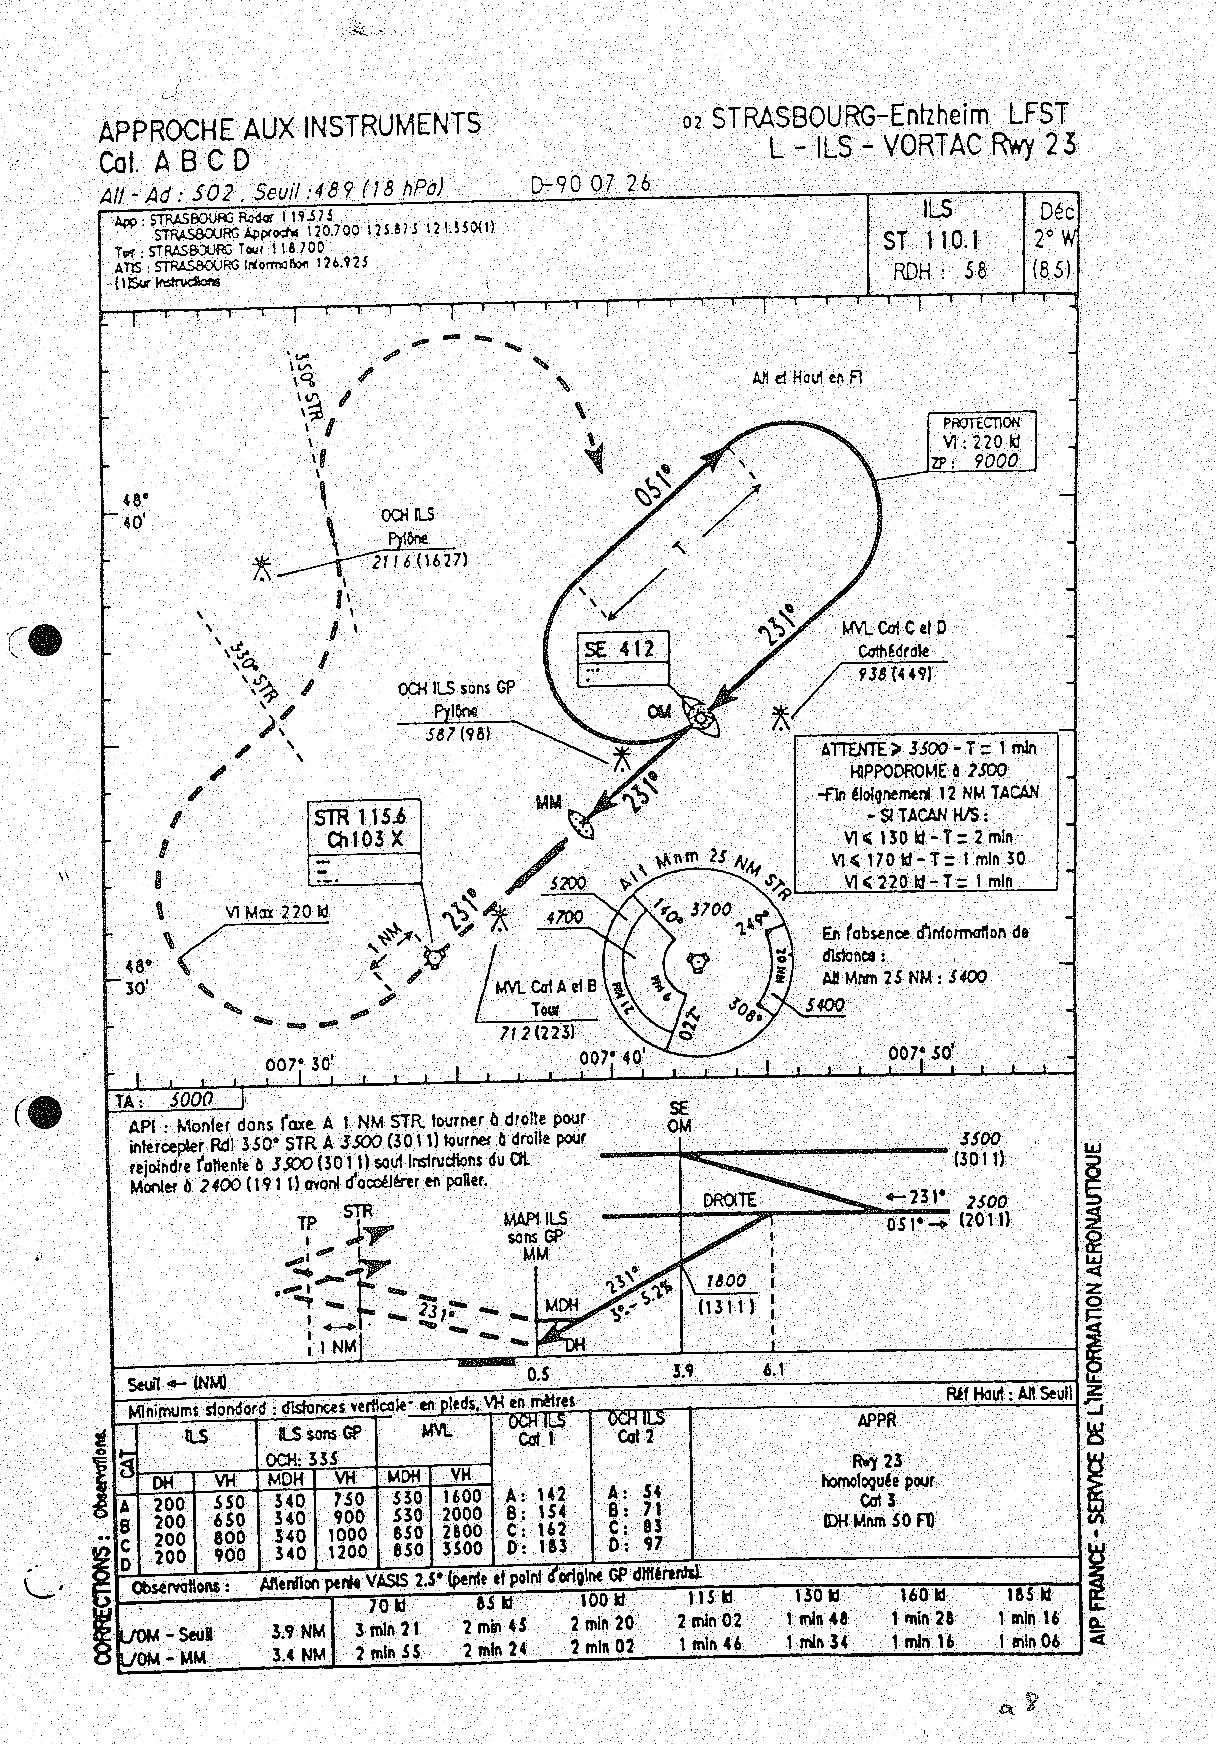
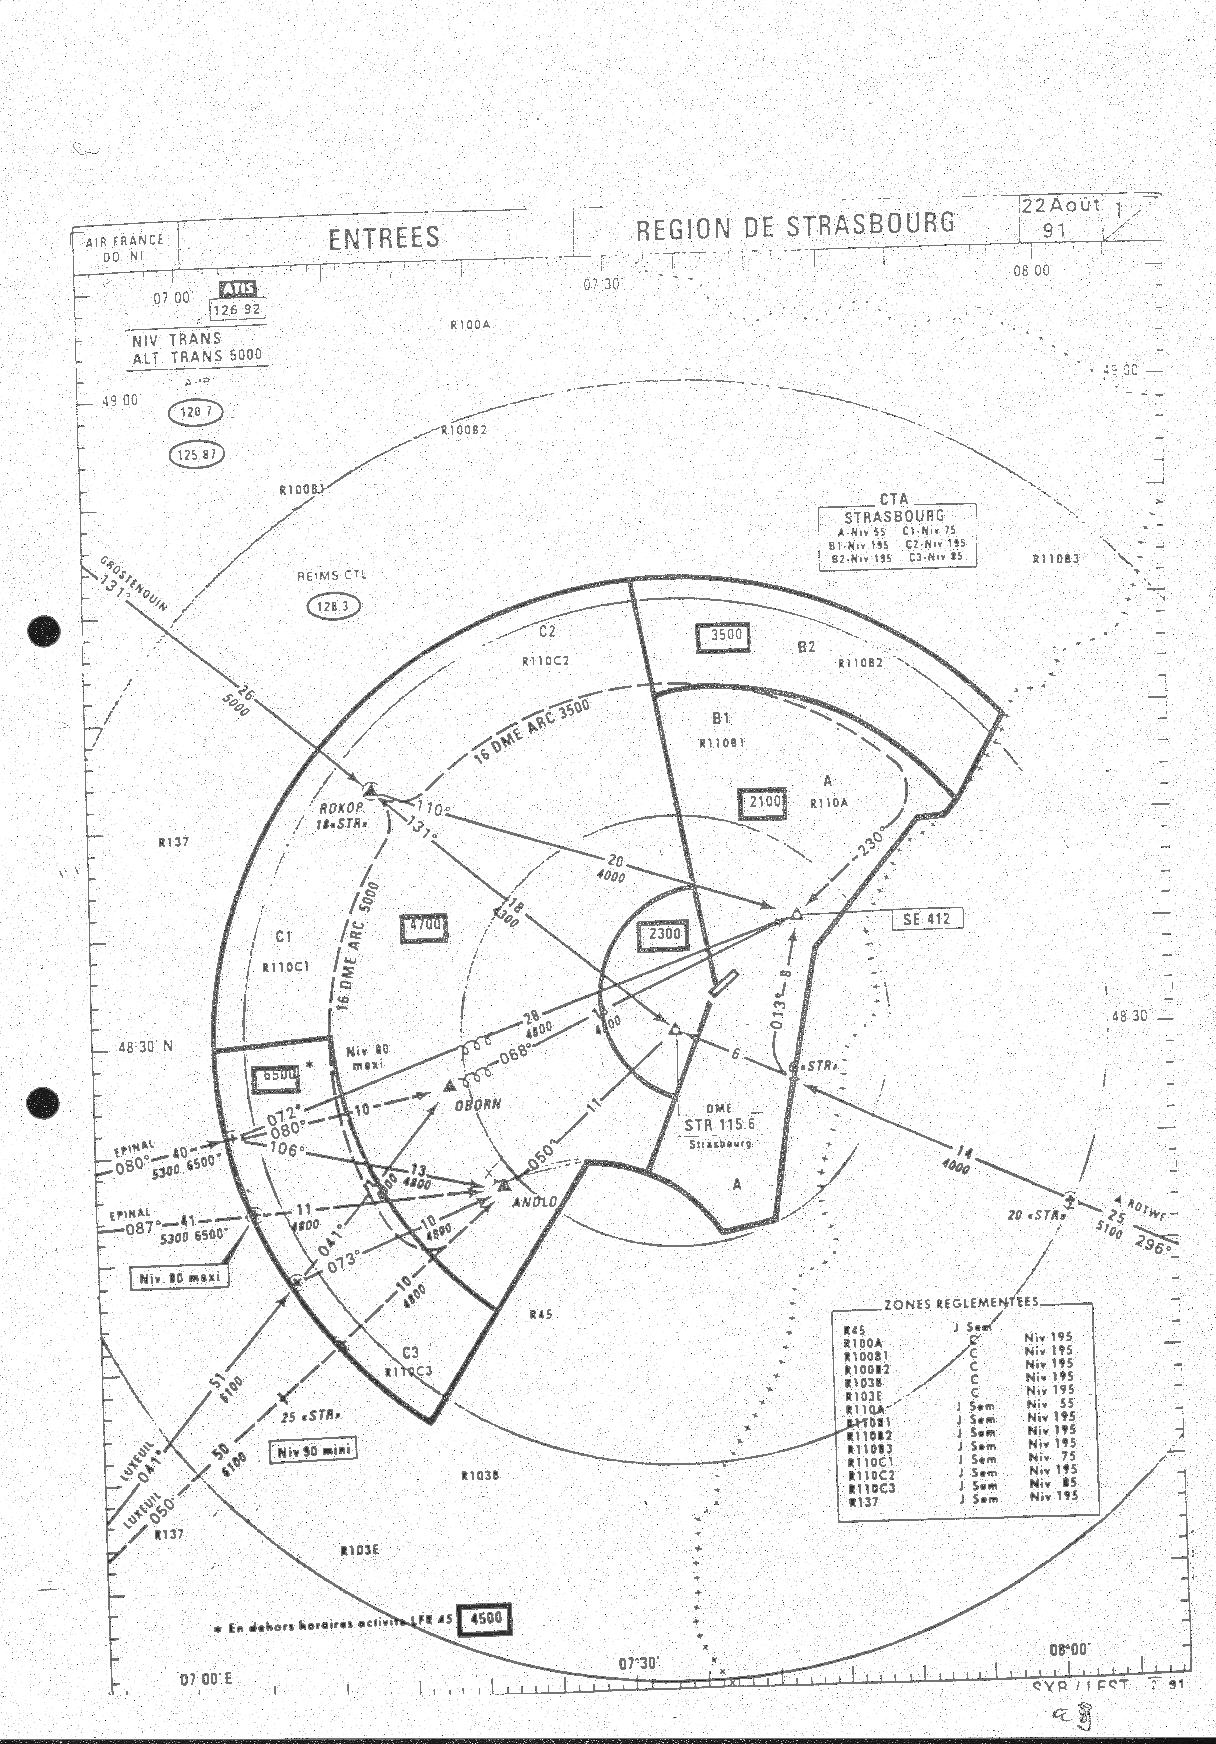
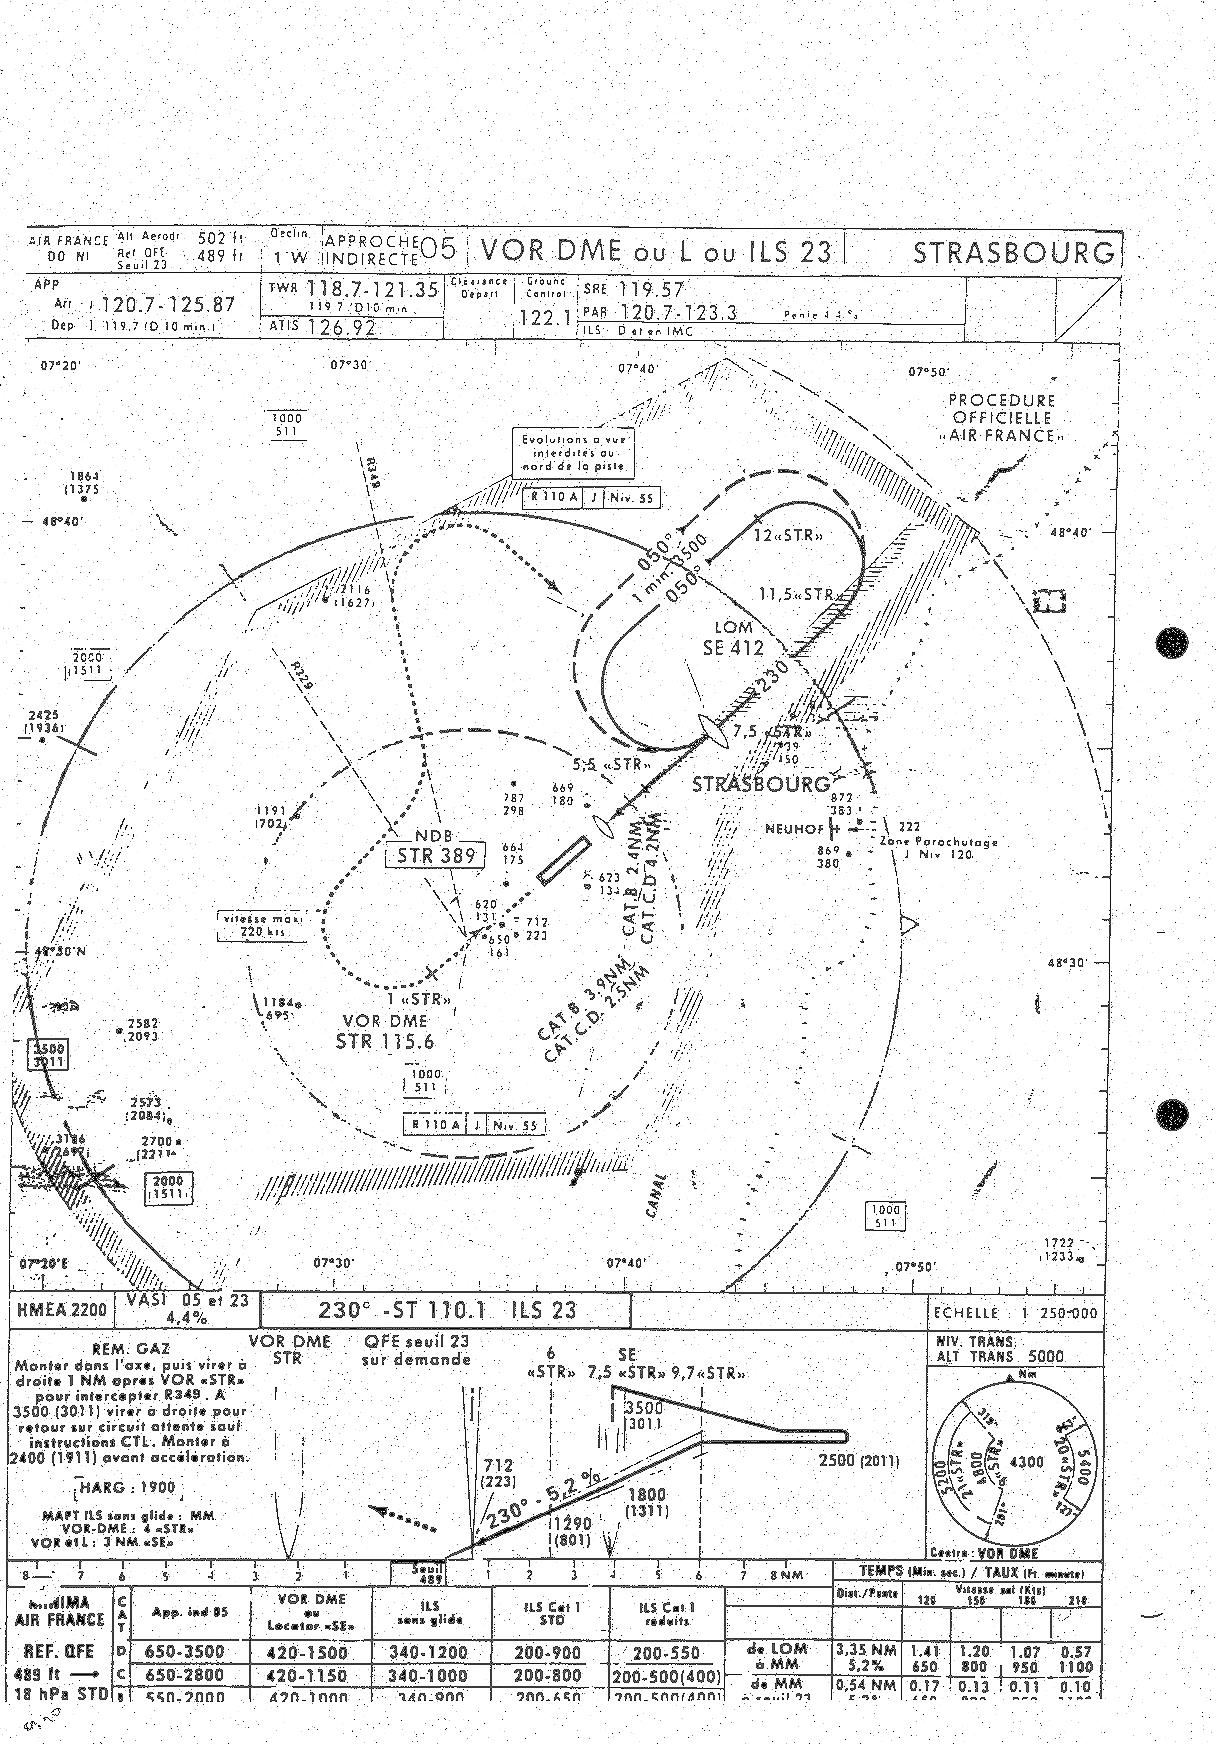
| a6-1.jpg | Appenix 6: Diagram of approaching procedure |
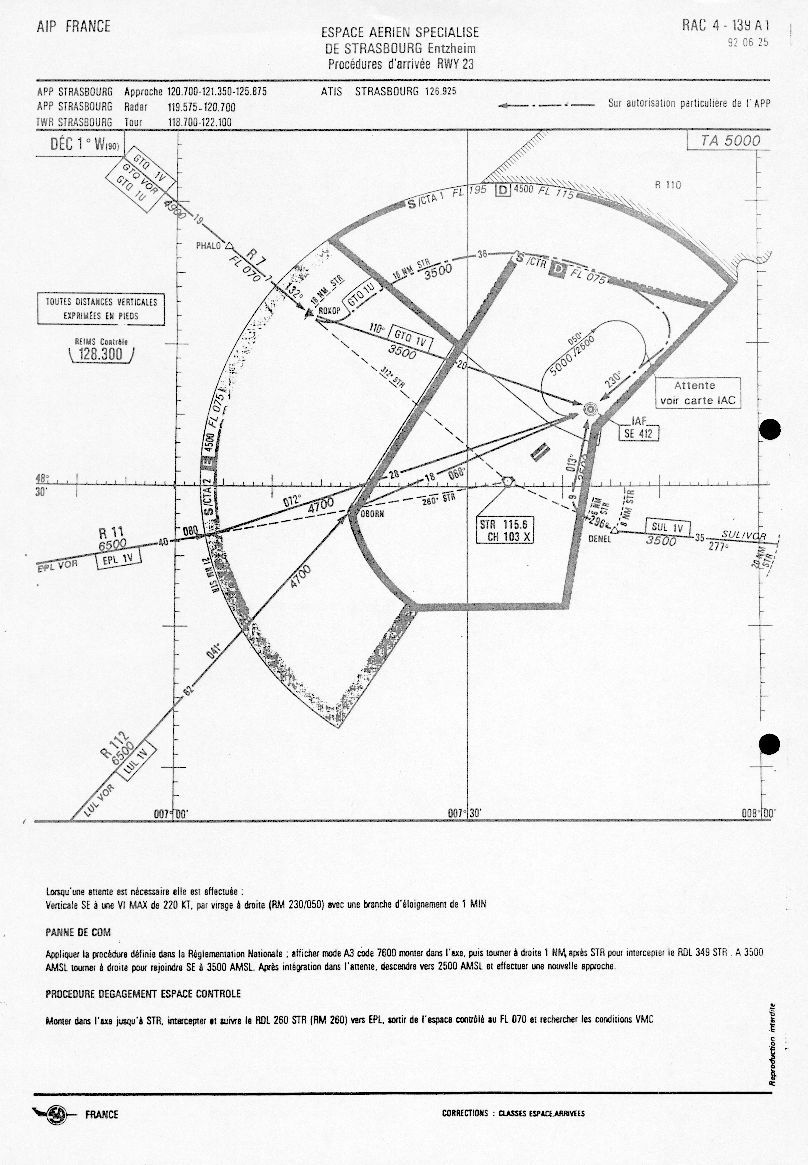
| a6-2.jpg | Appenix 6: Diagram of approaching procedure |
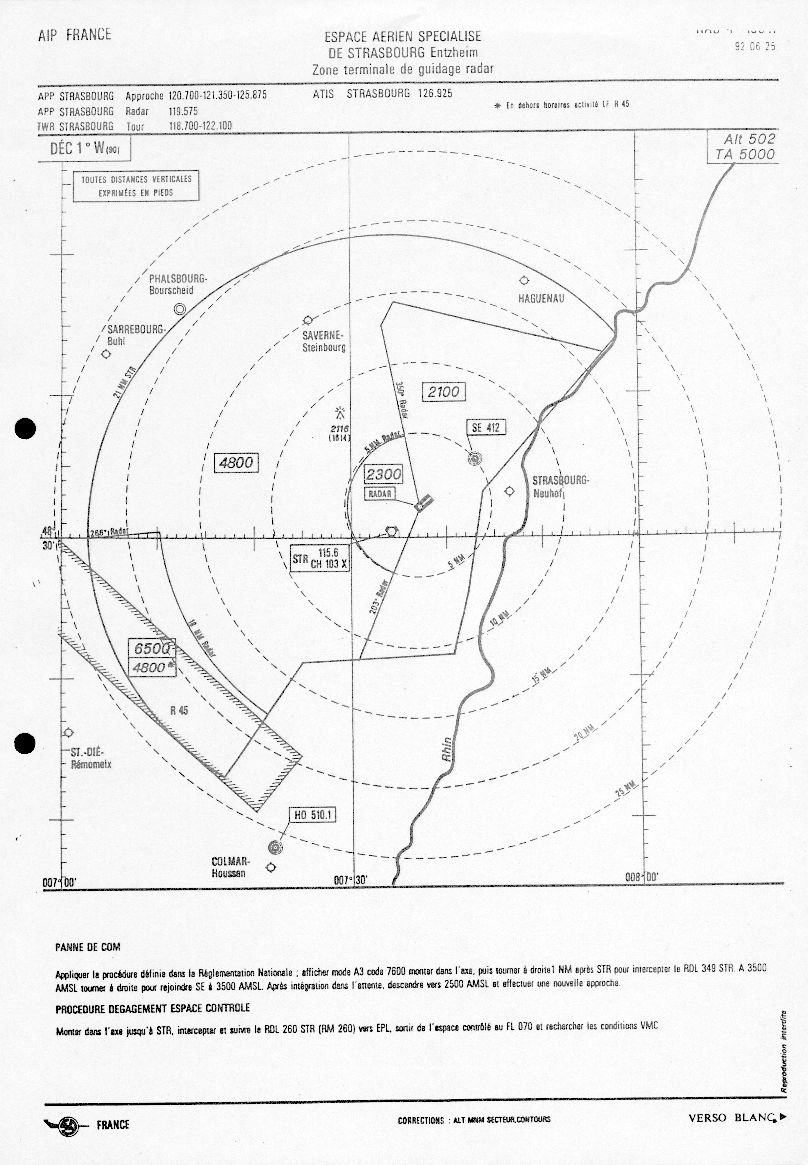
| a6-3.jpg | Appenix 6: Diagram of approaching procedure |
| a6-4.jpg | Appenix 6: Diagram of approaching procedure |
| a6-6.jpg | Appenix 6: Diagram of approaching procedure |
| a6-7.jpg | Appenix 6: Diagram of approaching procedure |
| a6-8.jpg | Appenix 6: Diagram of approaching procedure |
| a6-9.jpg | Appenix 6: Diagram of approaching procedure |
| a6-10.jpg | Appenix 6: Diagram of approaching procedure |
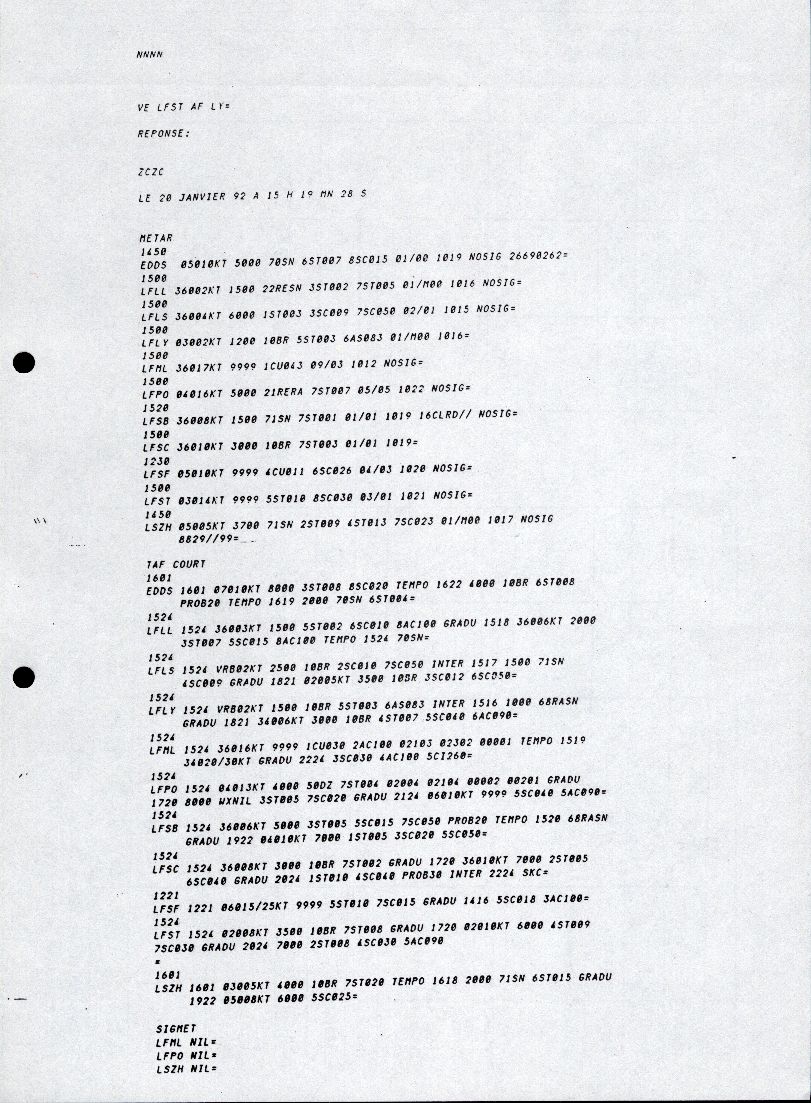
| Sorry | Appenix 7: Graphik of the QAR parameters -should be digitised (bad copy) |
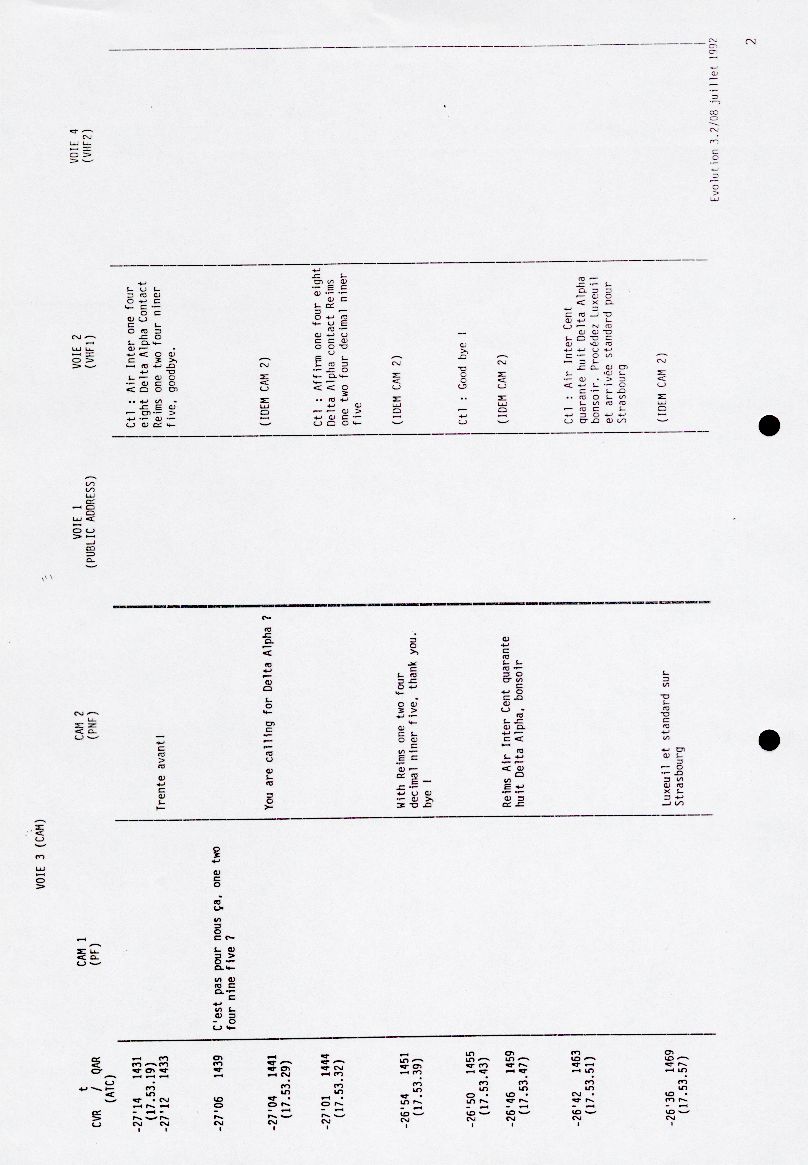
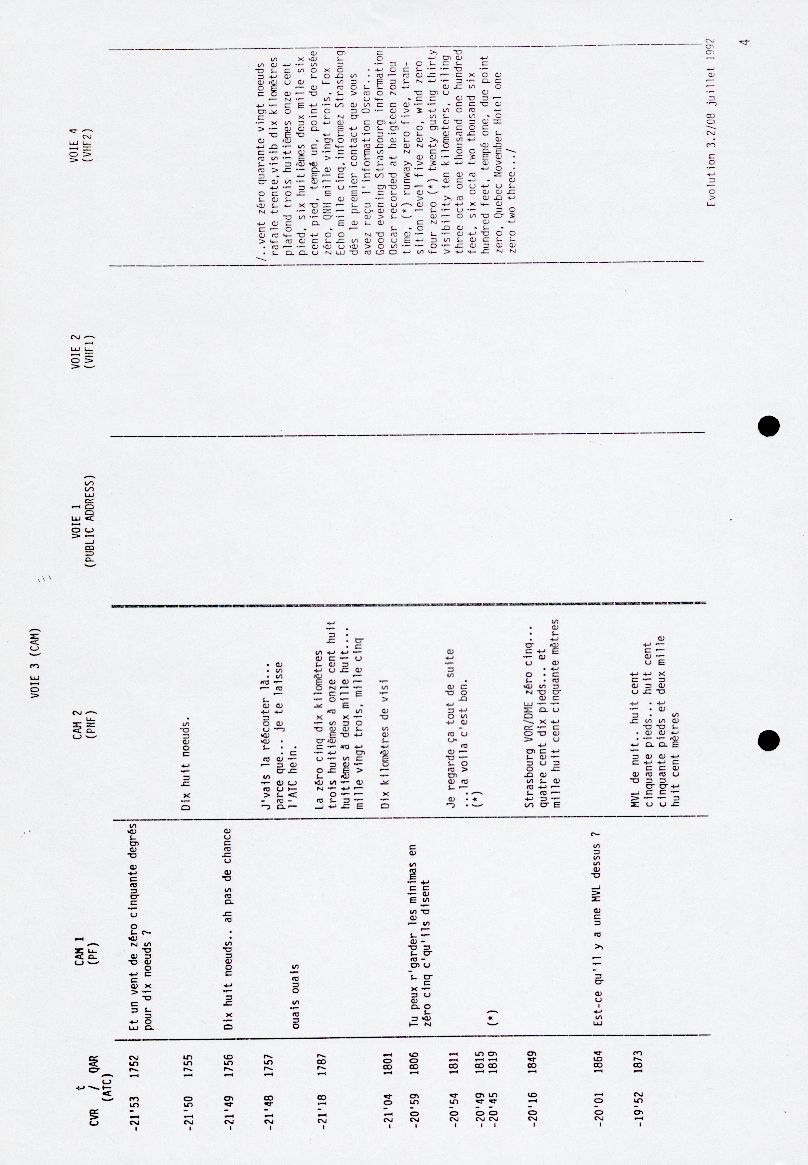
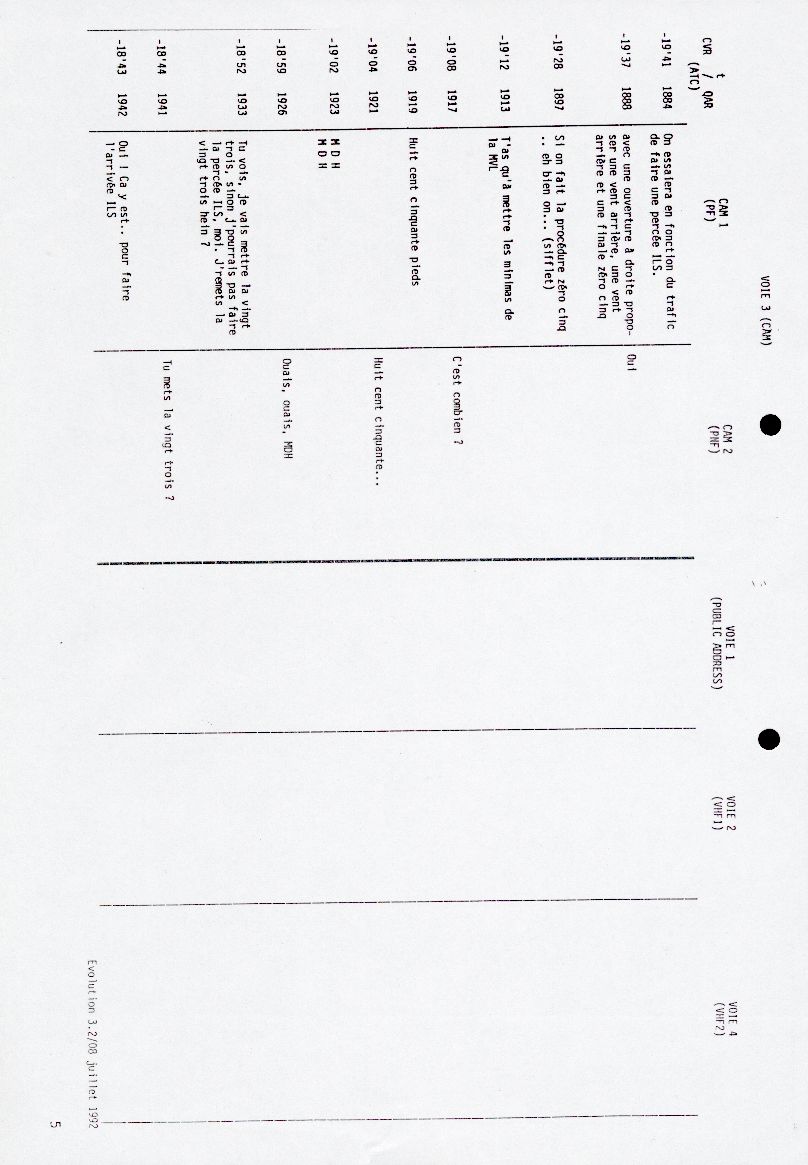
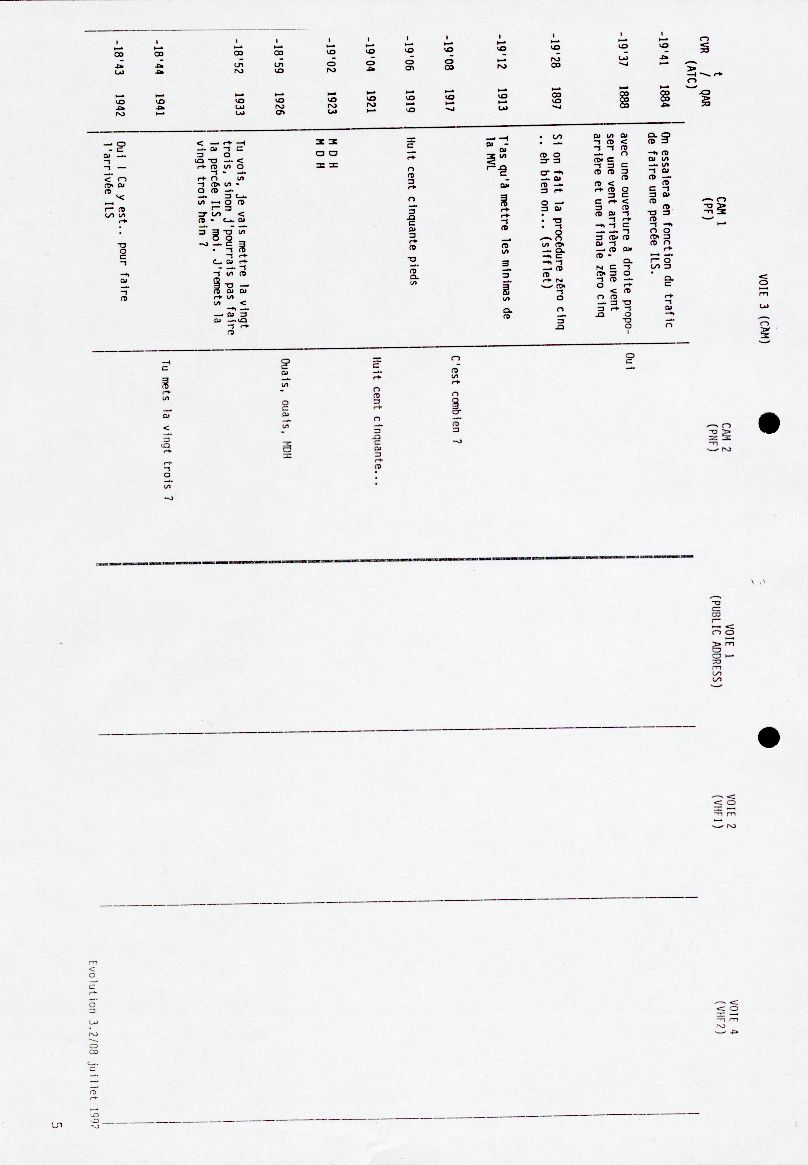
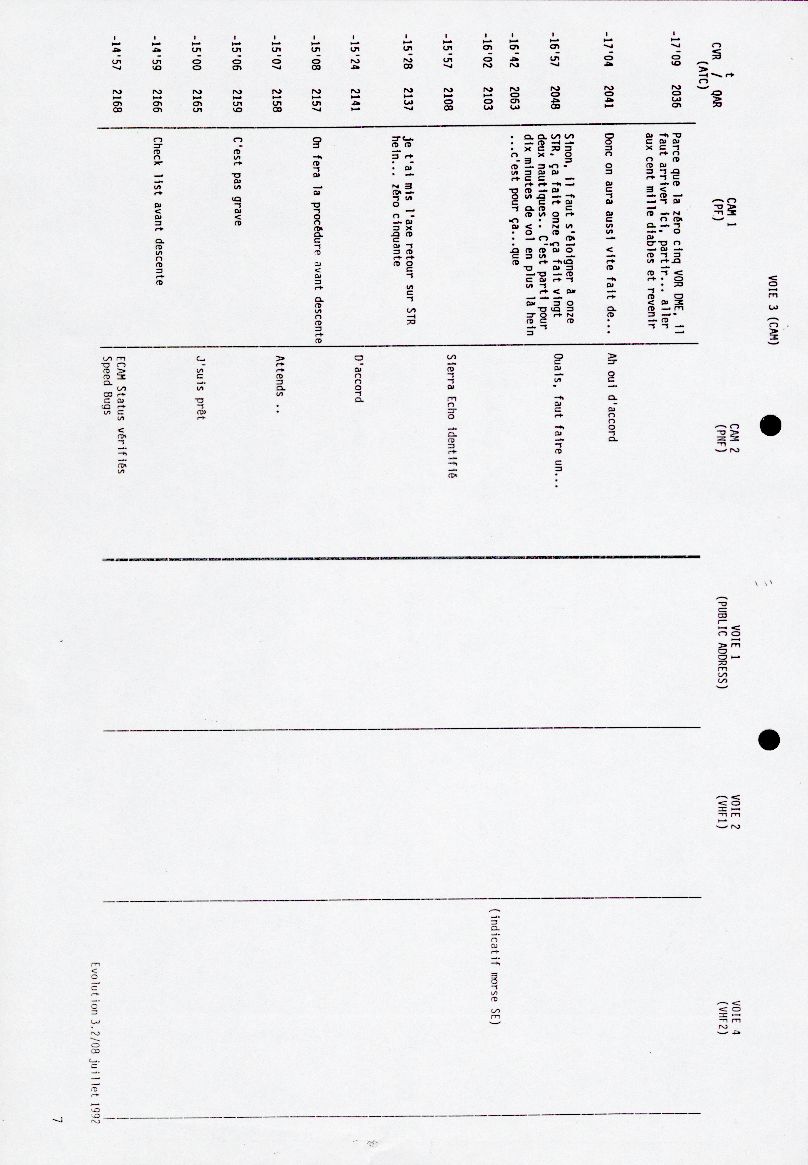
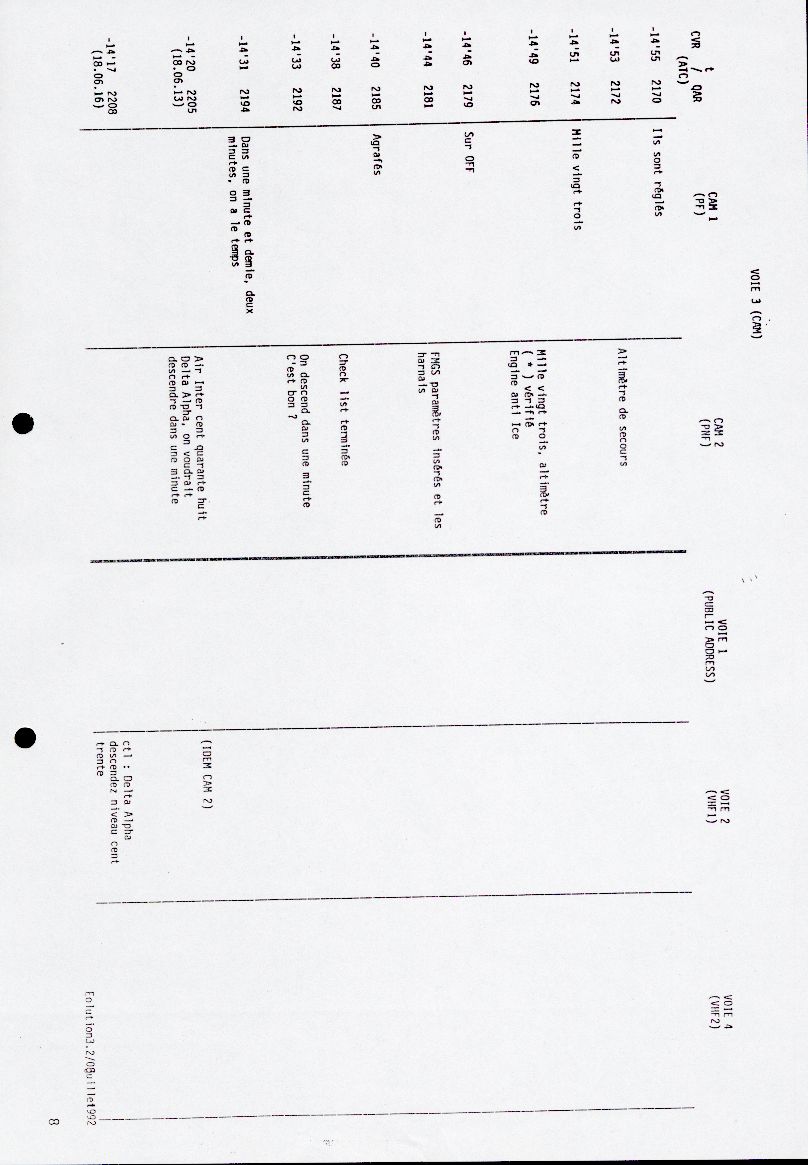
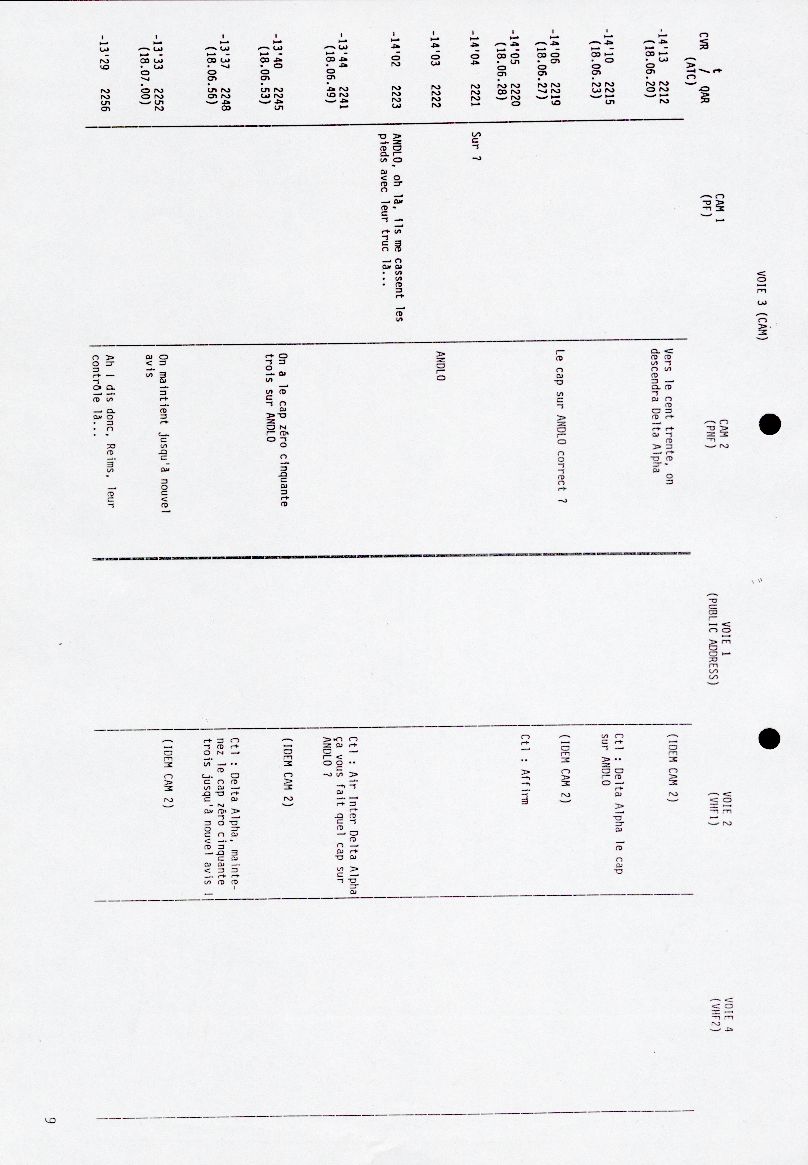
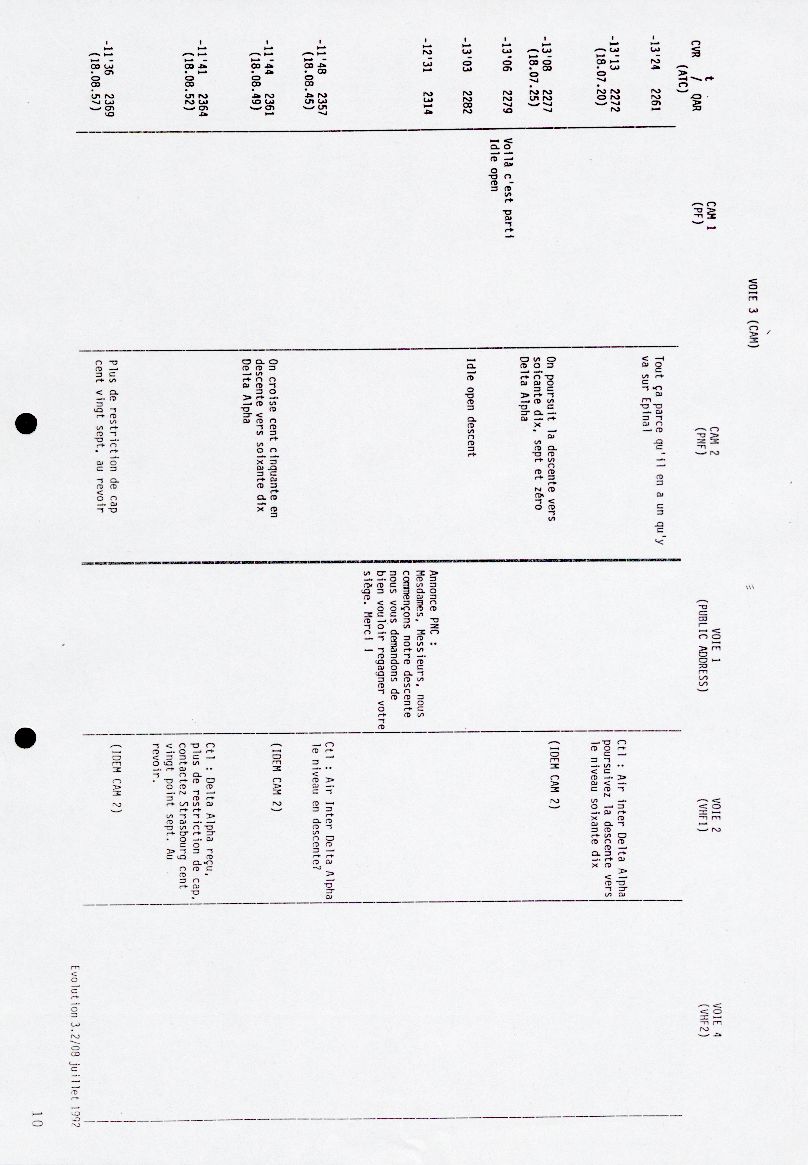
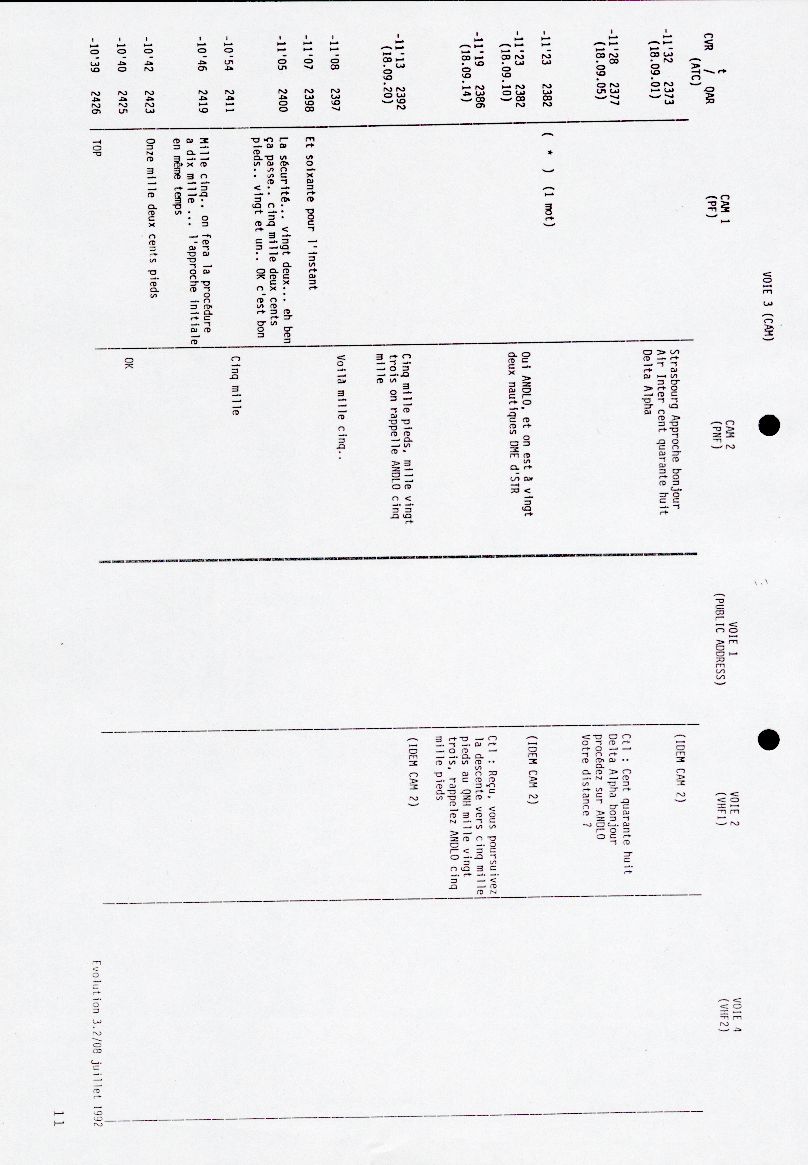
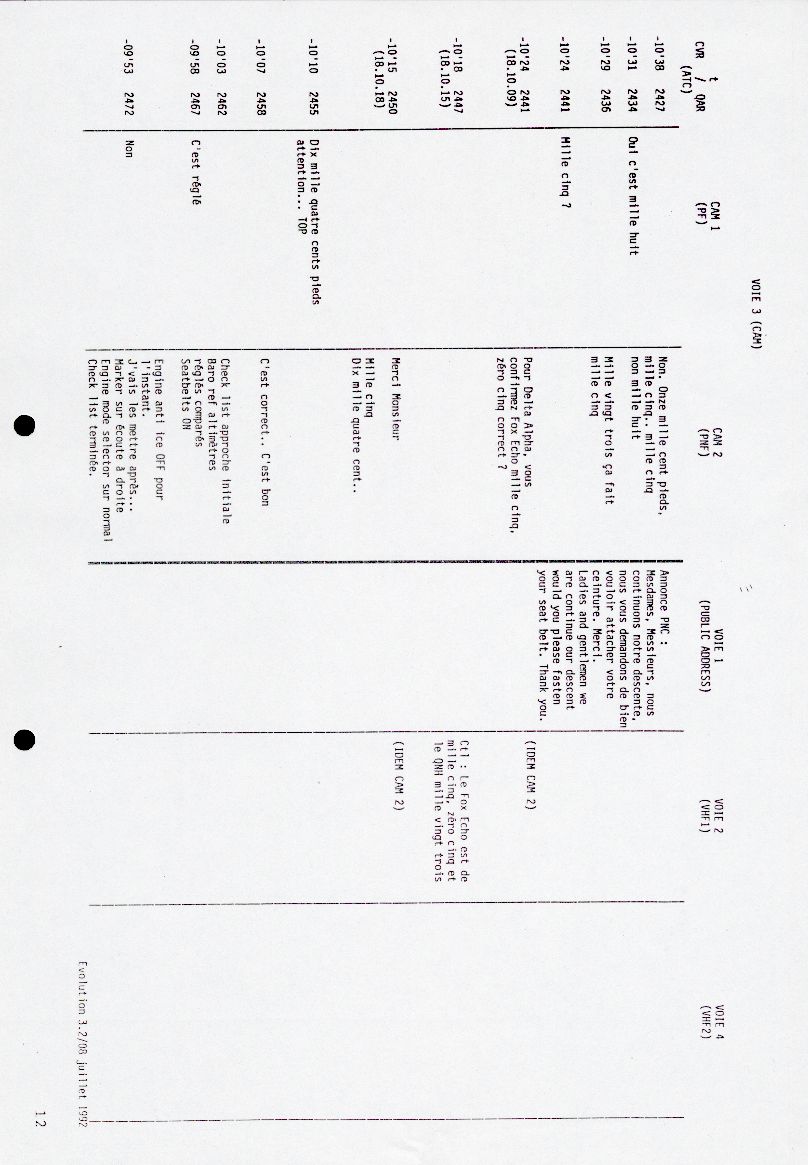
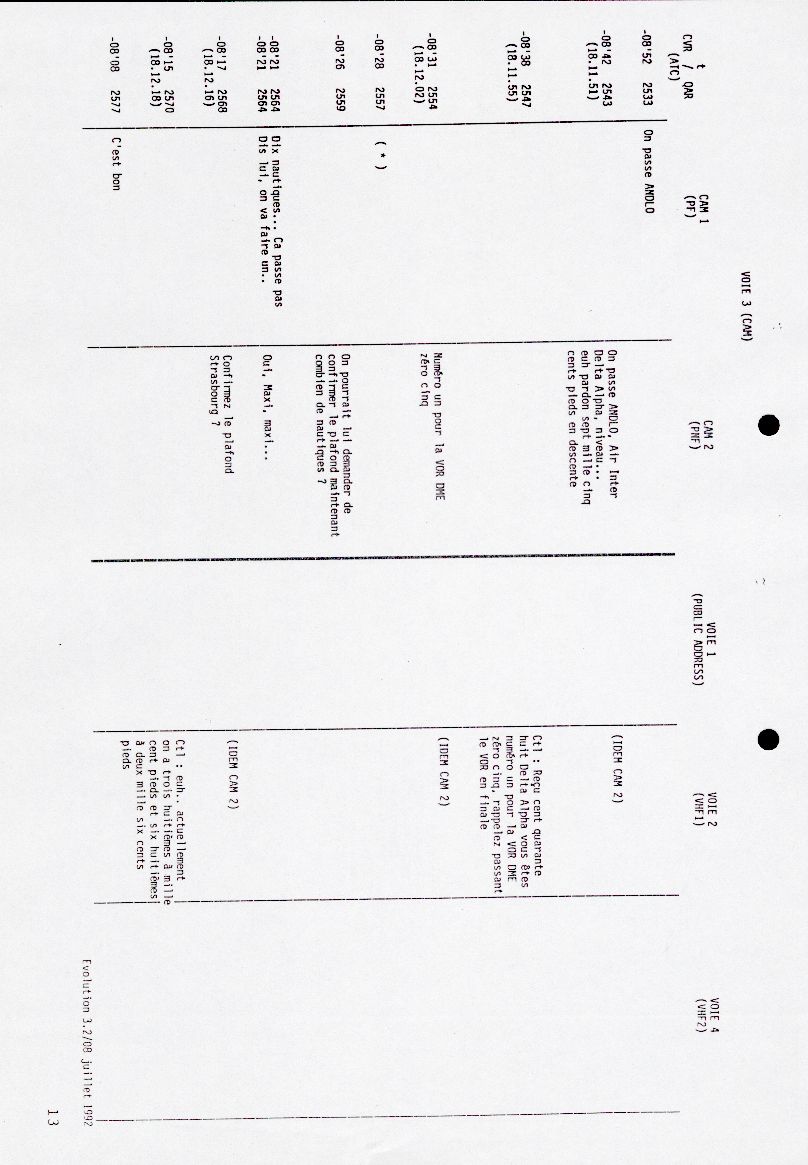
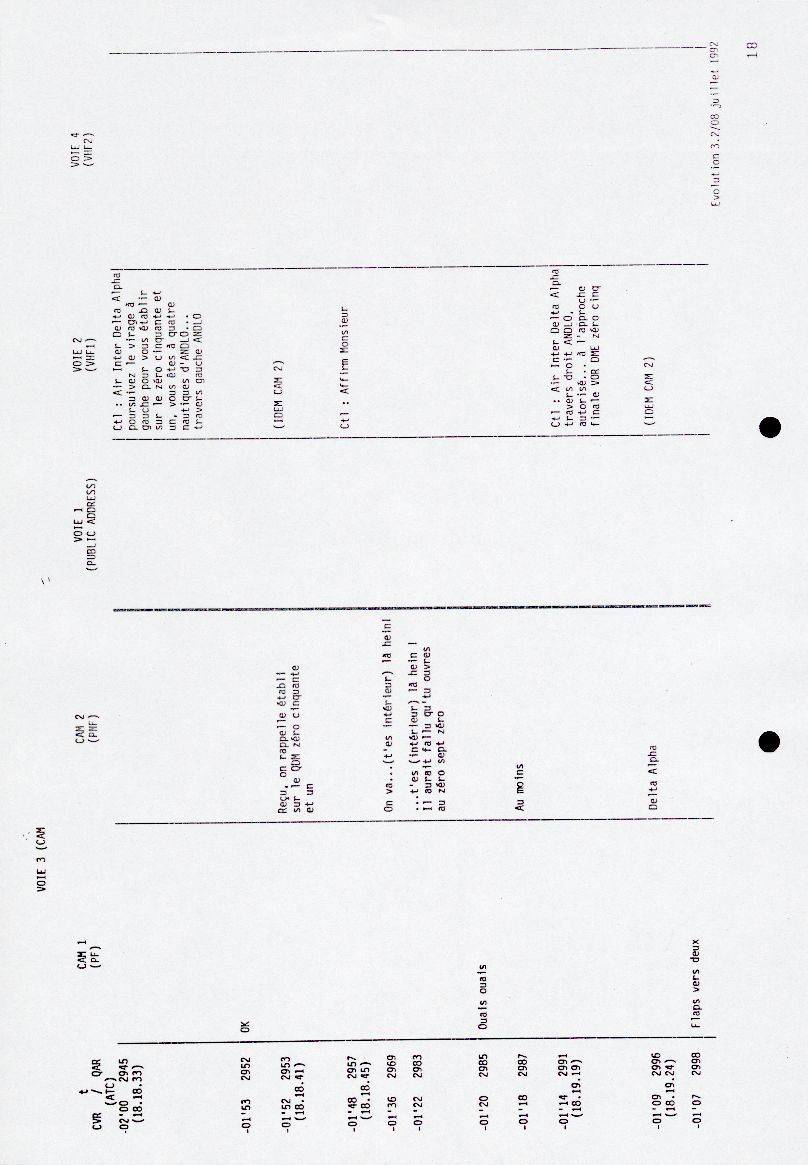
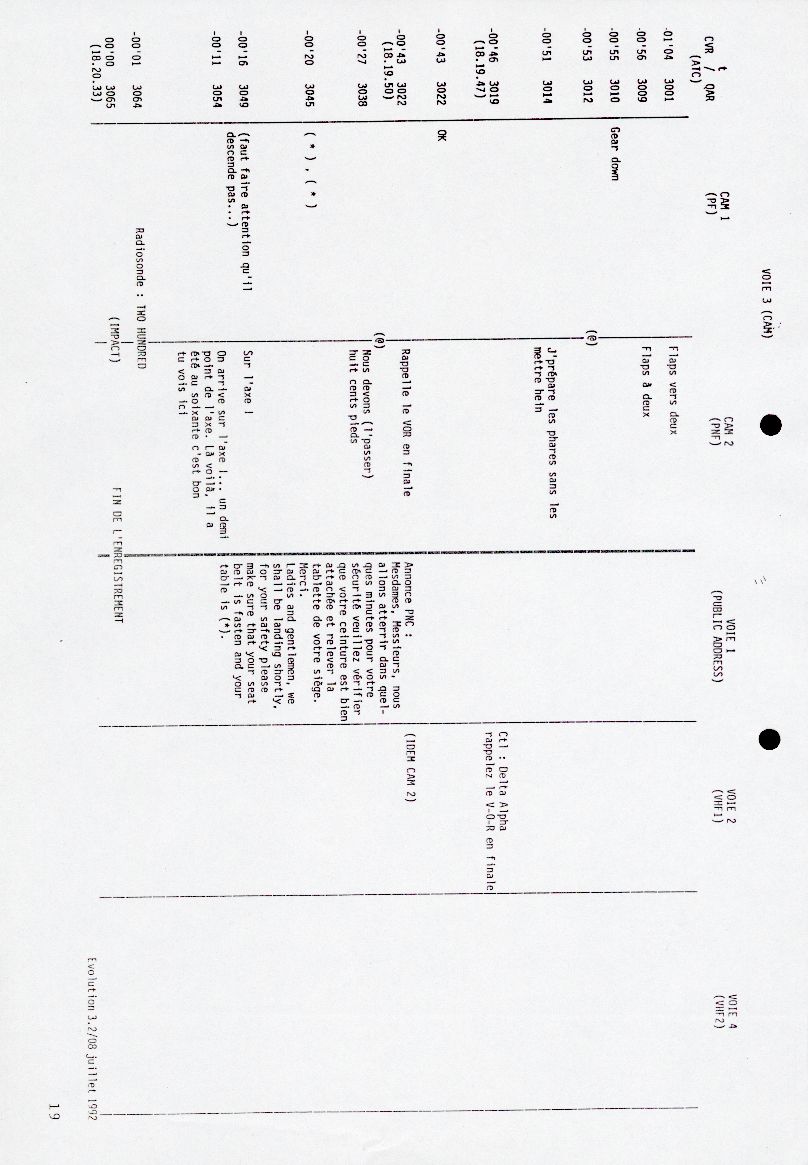
| a8page1-2.htm | Appenix 8: Extract of the CVR transcription |
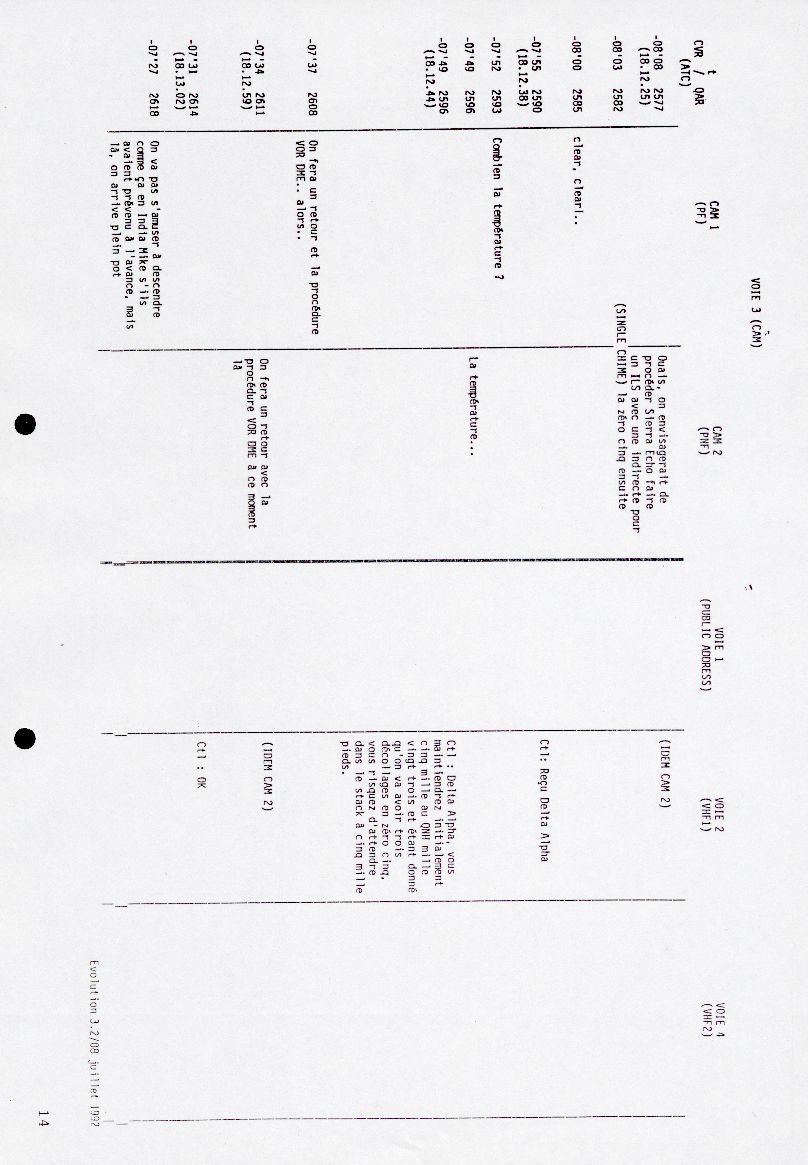
| a8-2.jpg | Appenix 8: Extract of the CVR transcription |
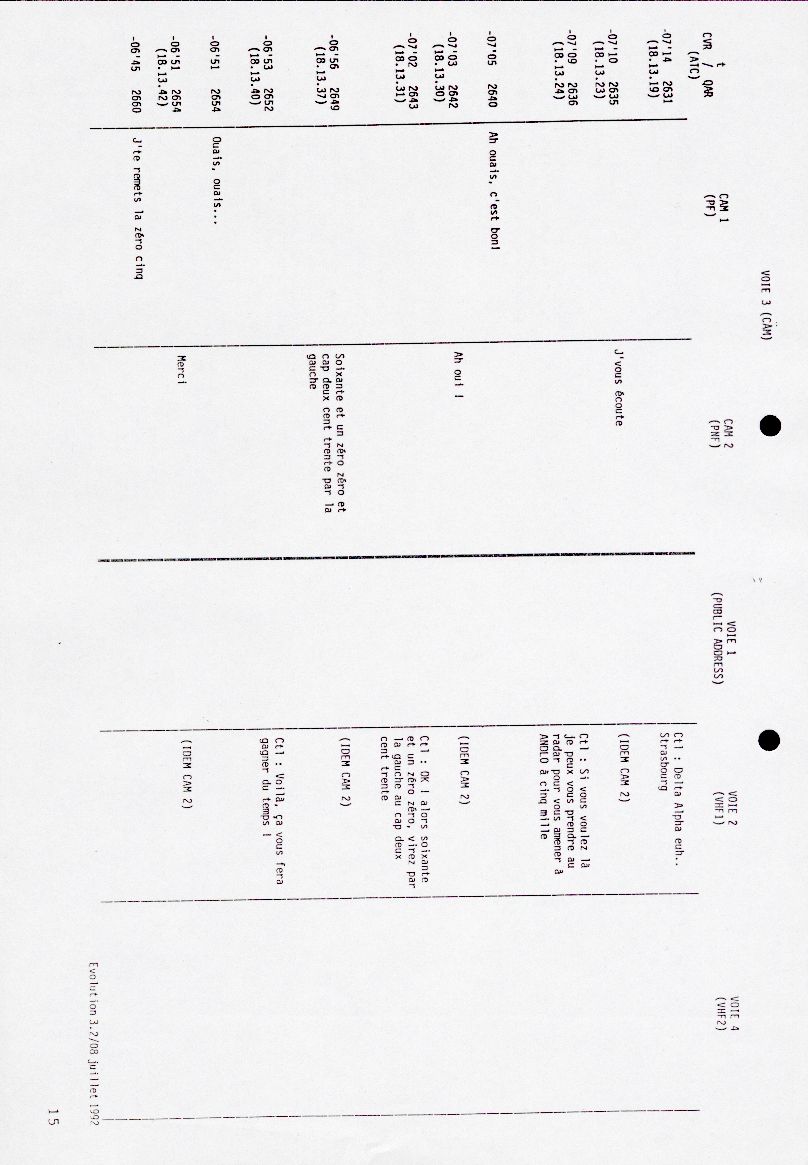
| a8-3.jpg | Appenix 8: Extract of the CVR transcription |
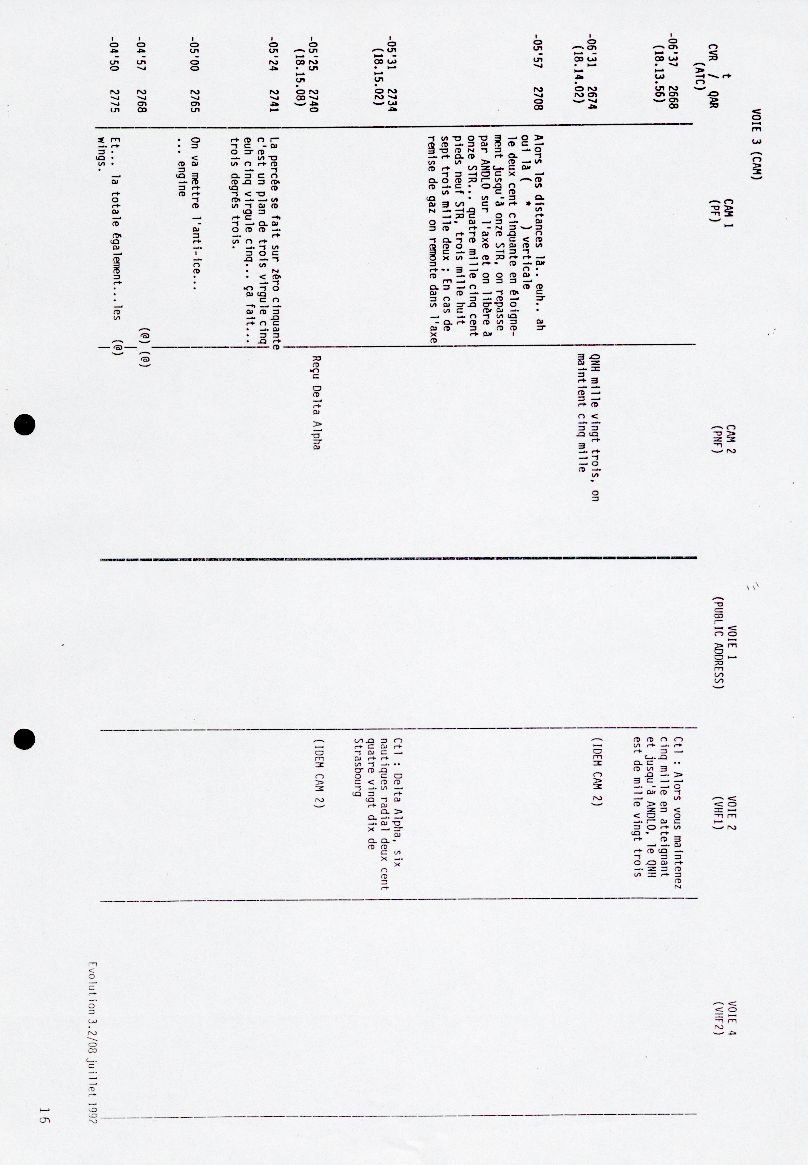
| a8-4.jpg | Appenix 8: Extract of the CVR transcription |
| a8-5.jpg | Appenix 8: Extract of the CVR transcription |
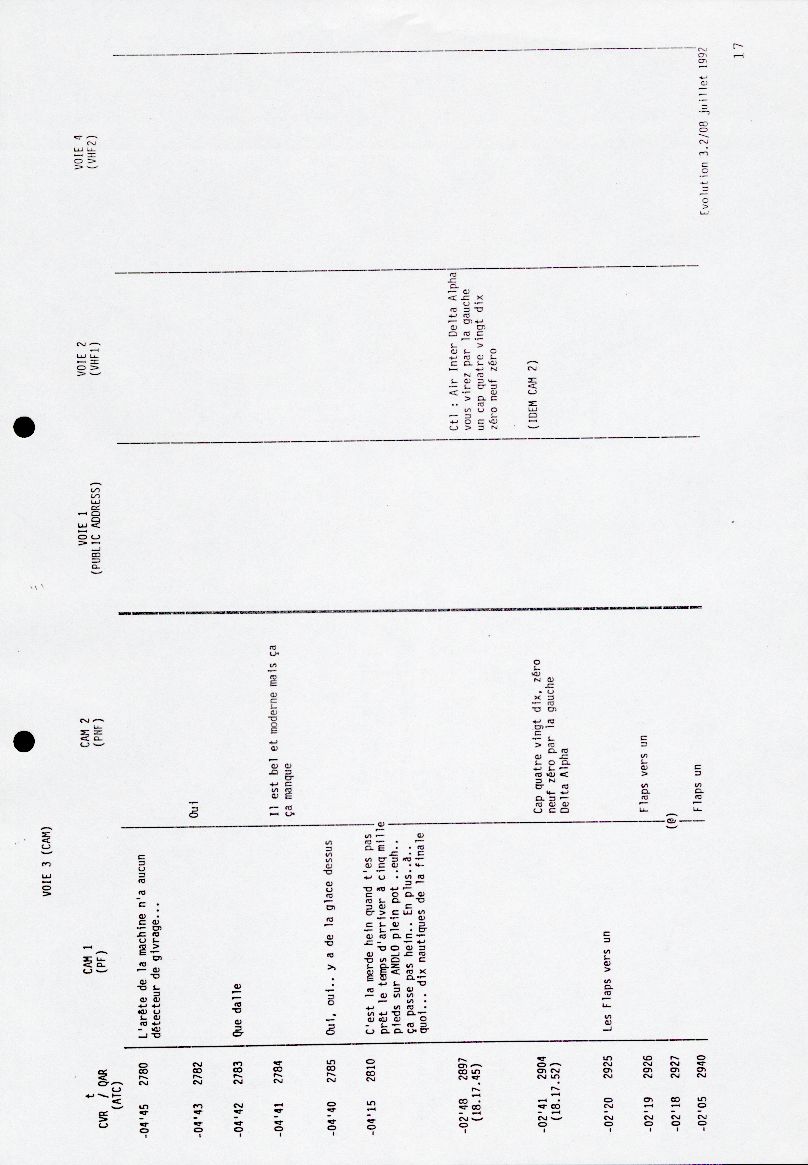
| a8-6.jpg | Appenix 8: Extract of the CVR transcription |
| a8-7.jpg | Appenix 8: Extract of the CVR transcription |
| a8-8.jpg | Appenix 8: Extract of the CVR transcription |
| a8-9.jpg | Appenix 8: Extract of the CVR transcription |
| a8-10.jpg | Appenix 8: Extract of the CVR transcription |
| a8-11.jpg | Appenix 8: Extract of the CVR transcription |
| a8-12.jpg | Appenix 8: Extract of the CVR transcription |
| a8-13.jpg | Appenix 8: Extract of the CVR transcription |
| a8-14.jpg | Appenix 8: Extract of the CVR transcription |
| a8-15.jpg | Appenix 8: Extract of the CVR transcription |
| a8-16.jpg | Appenix 8: Extract of the CVR transcription |
| a8-17.jpg | Appenix 8: Extract of the CVR transcription |
| a8-18.jpg | Appenix 8: Extract of the CVR transcription |
| a8-19.jpg | Appenix 8: Extract of the CVR transcription |
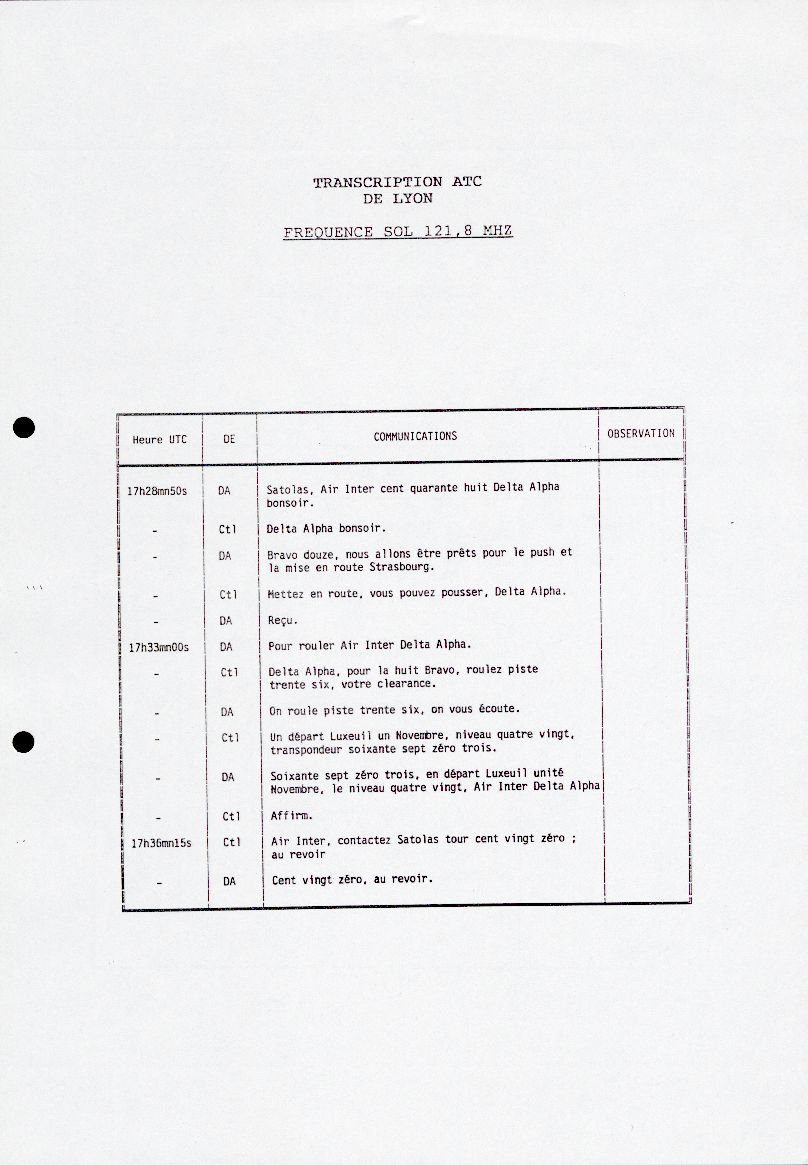
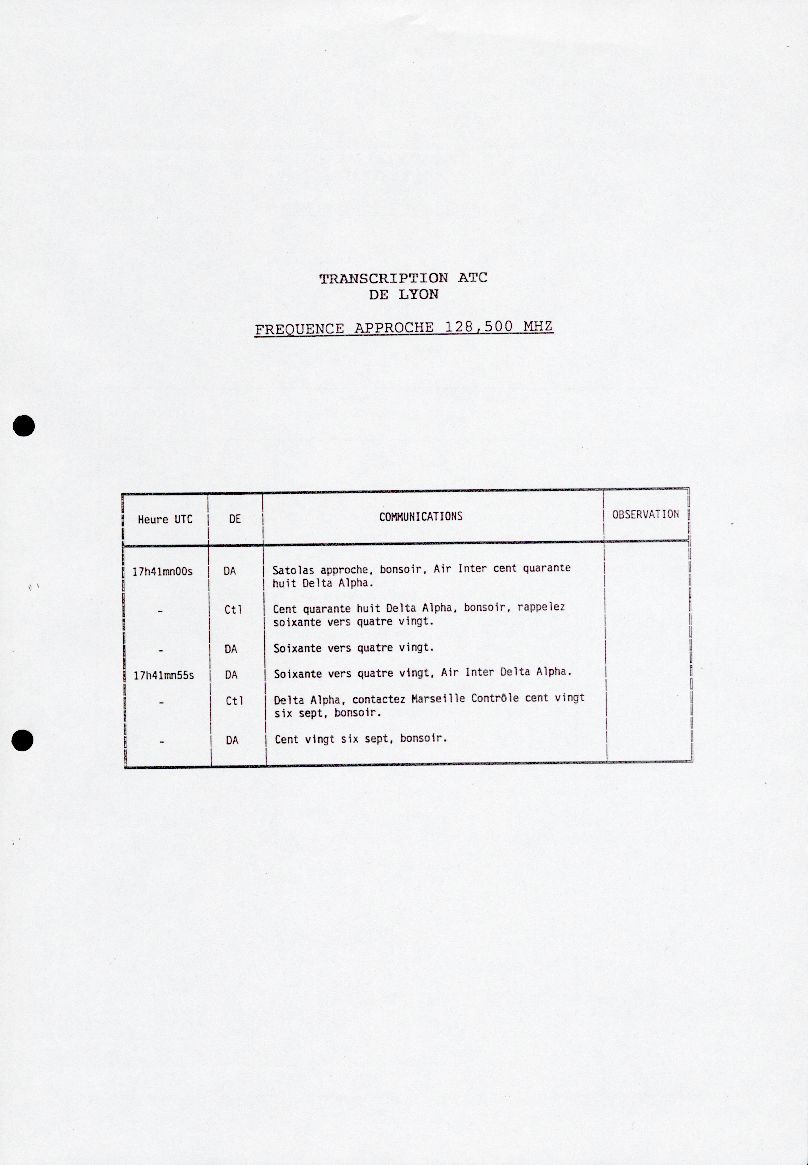
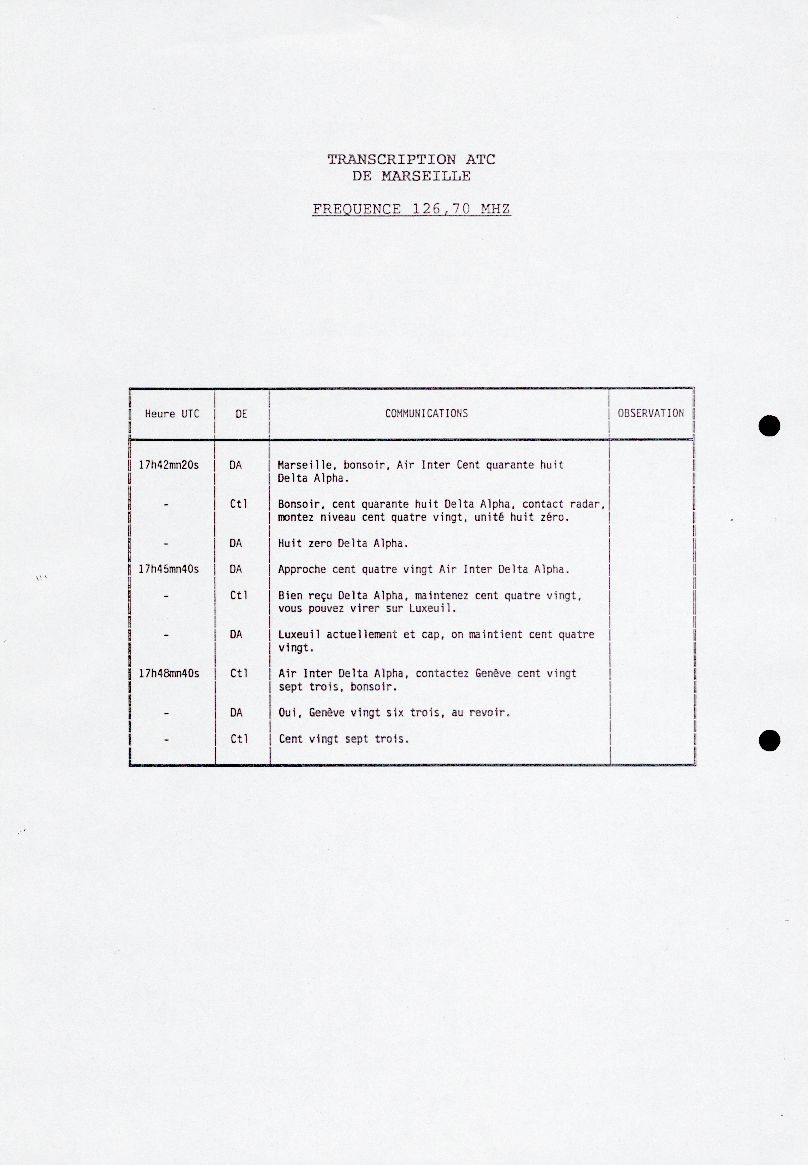
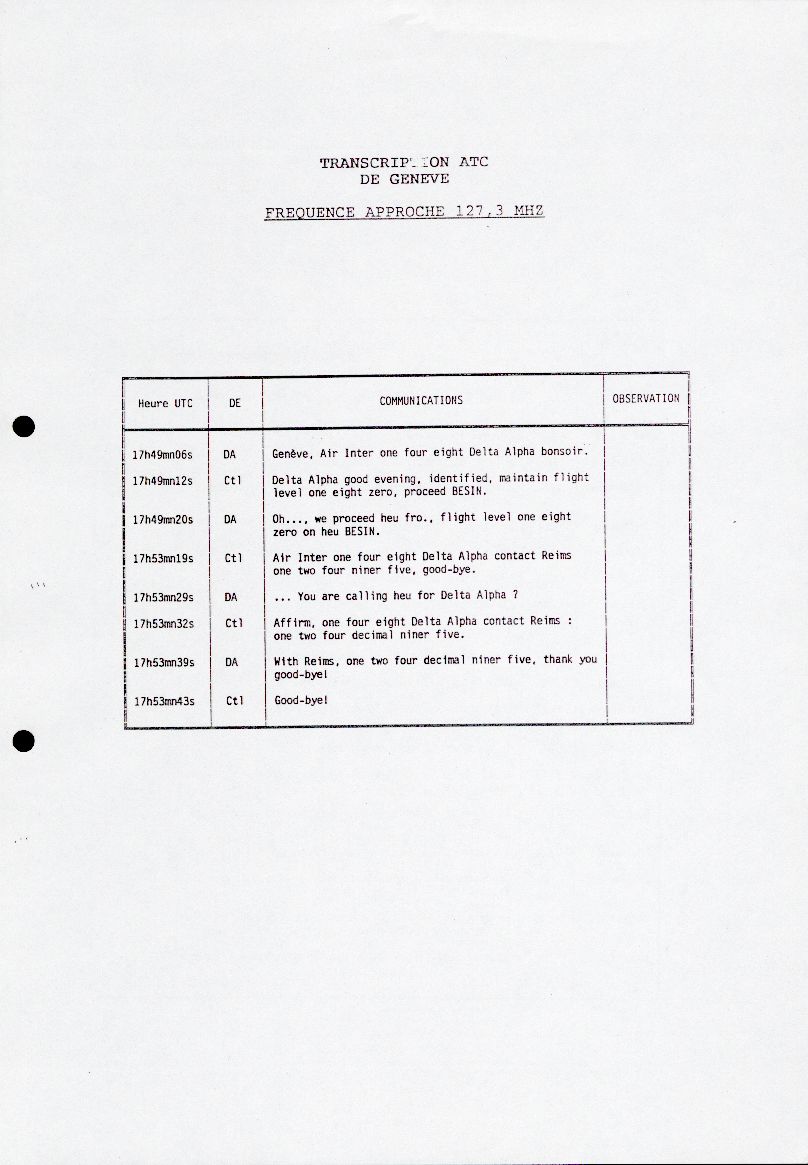
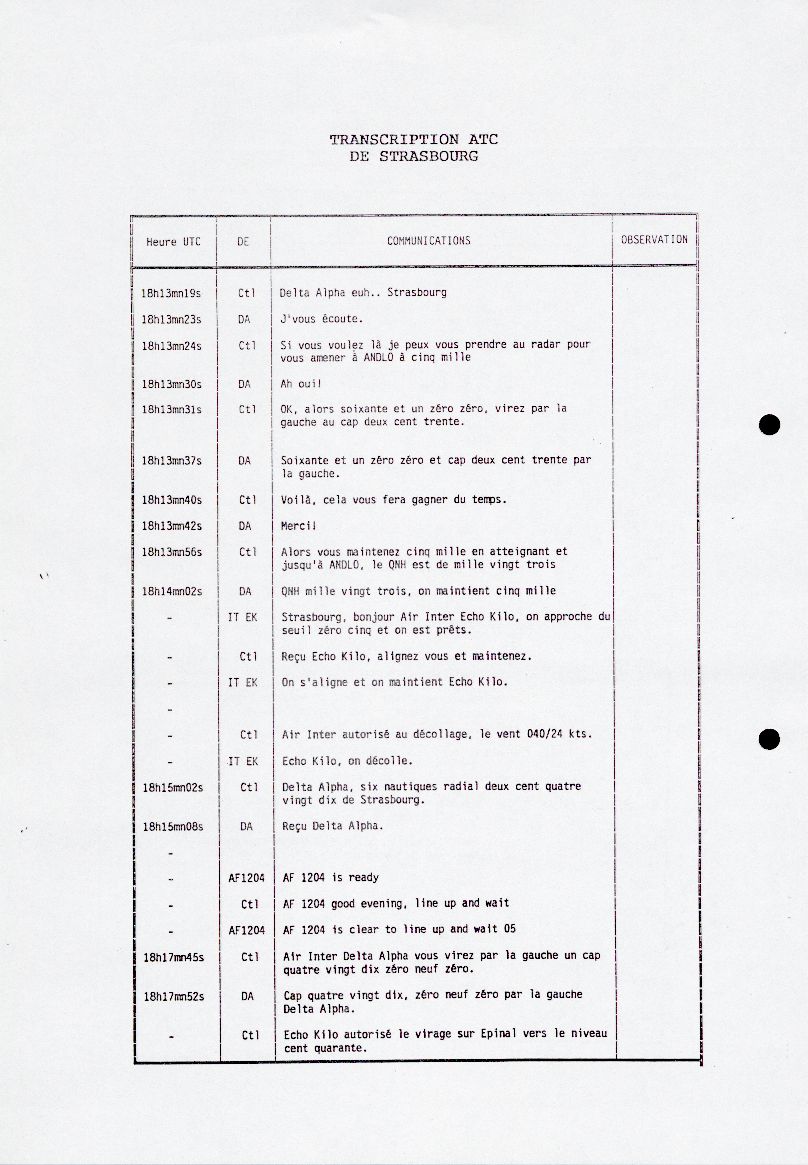
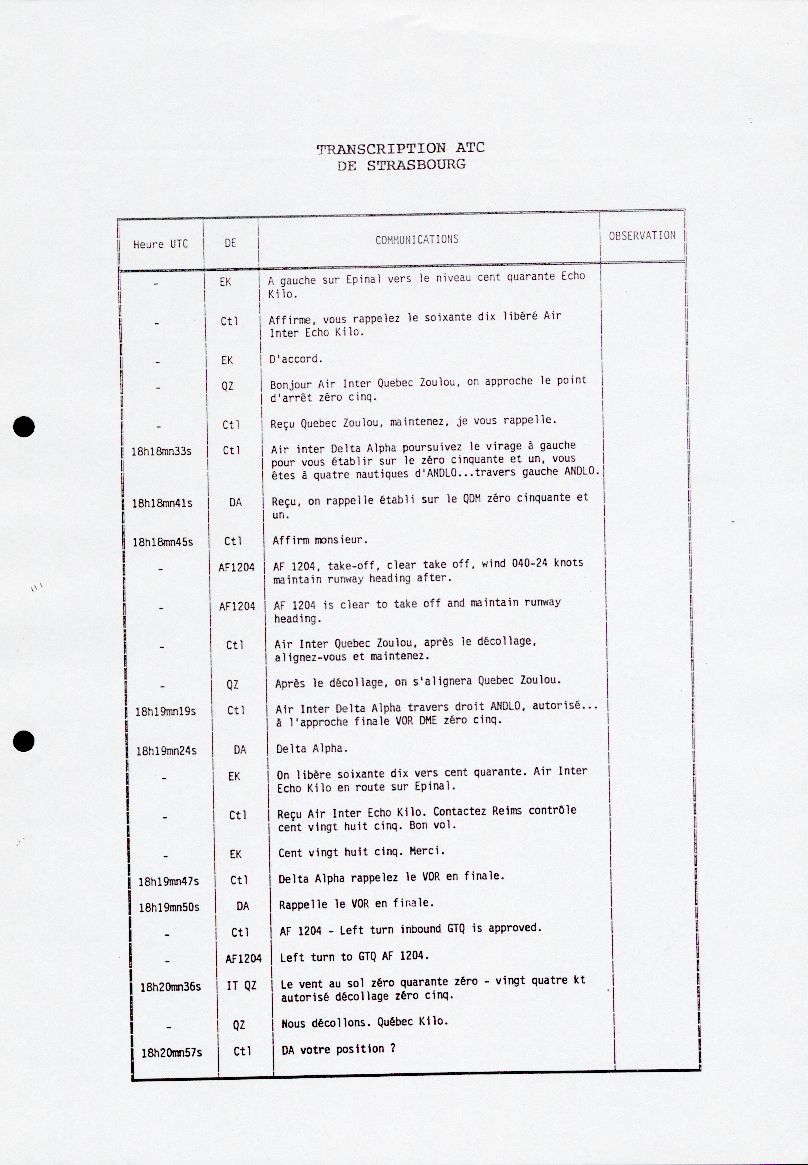
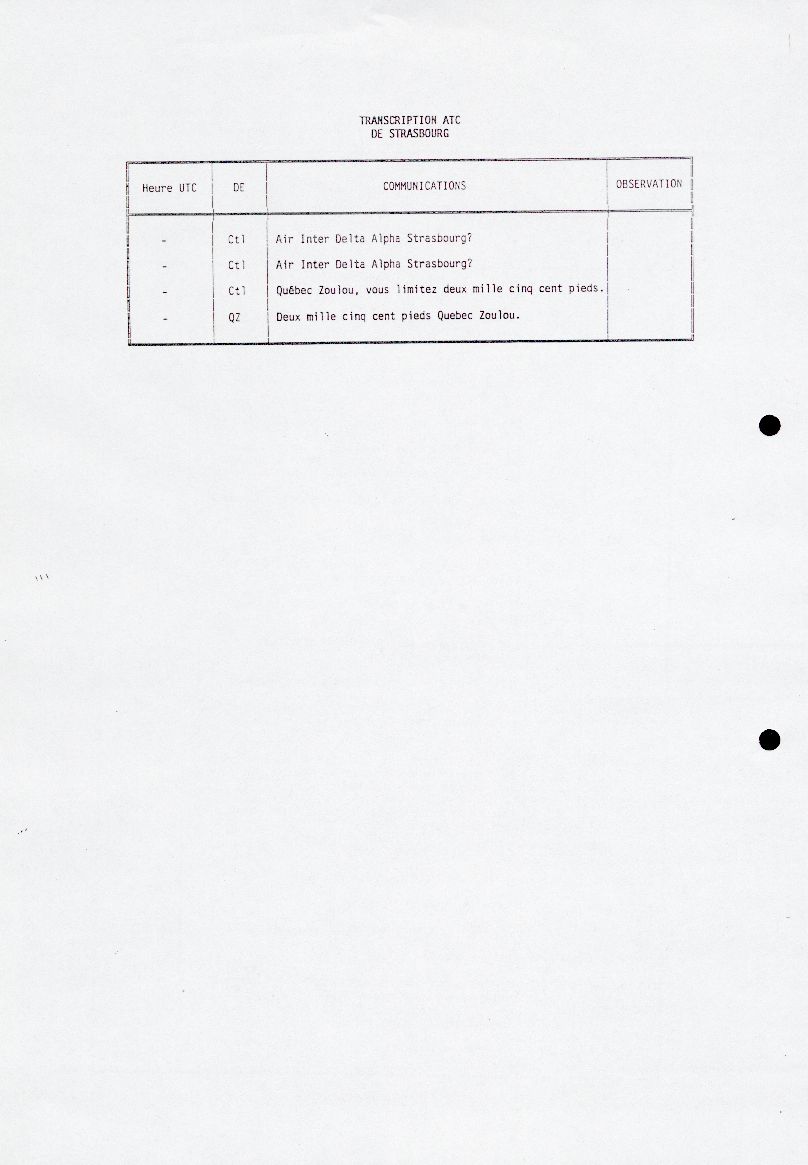
| a9-1.jpg | Appenix 9: Transcription of the ATC |
| a9-2.jpg | Appenix 9: Transcription of the ATC |
| a9-3.jpg | Appenix 9: Transcription of the ATC |
| a9-4.jpg | Appenix 9: Transcription of the ATC |
| a9-5.jpg | Appenix 9: Transcription of the ATC |
| a9-6.jpg | Appenix 9: Transcription of the ATC |
| a9-7.jpg | Appenix 9: Transcription of the ATC |
| a9-8.jpg | Appenix 9: Transcription of the ATC |
| a9-9.jpg | Appenix 9: Transcription of the ATC |
| a9-10.jpg | Appenix 9: Transcription of the ATC |
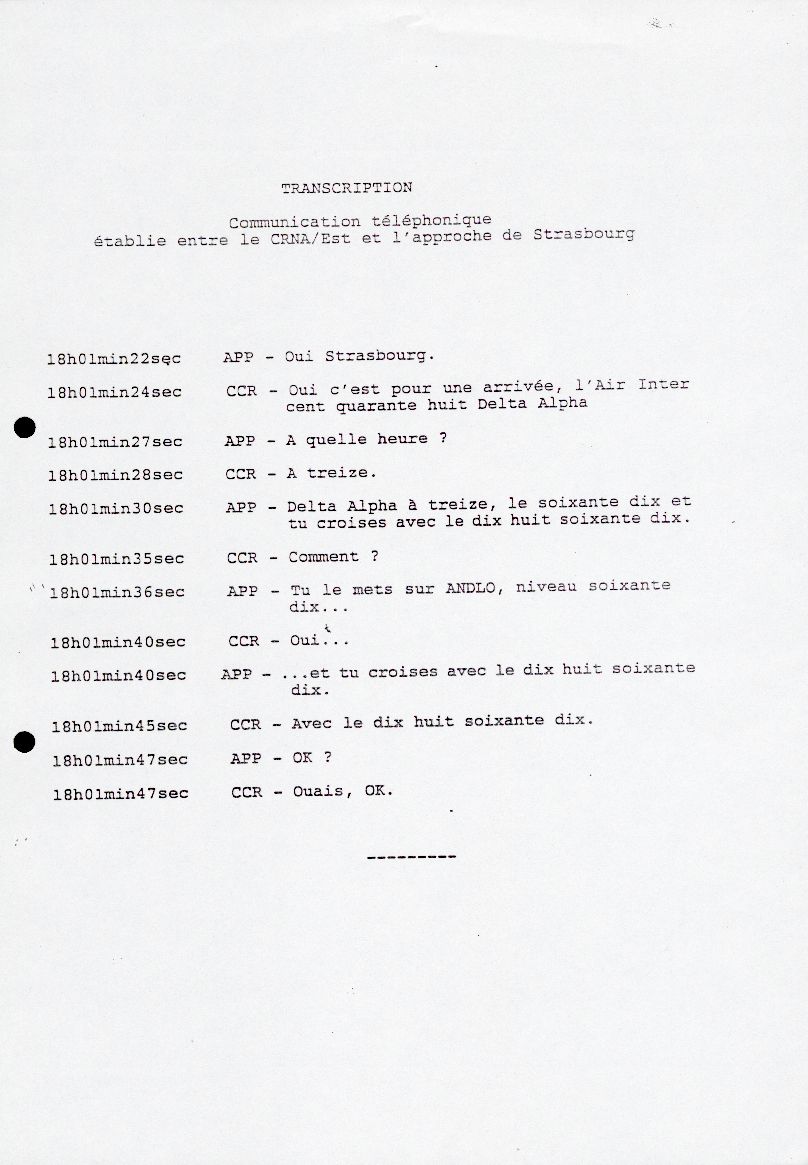
| a10-1.jpg | Appenix 10: Transcription of the communication with telephone |
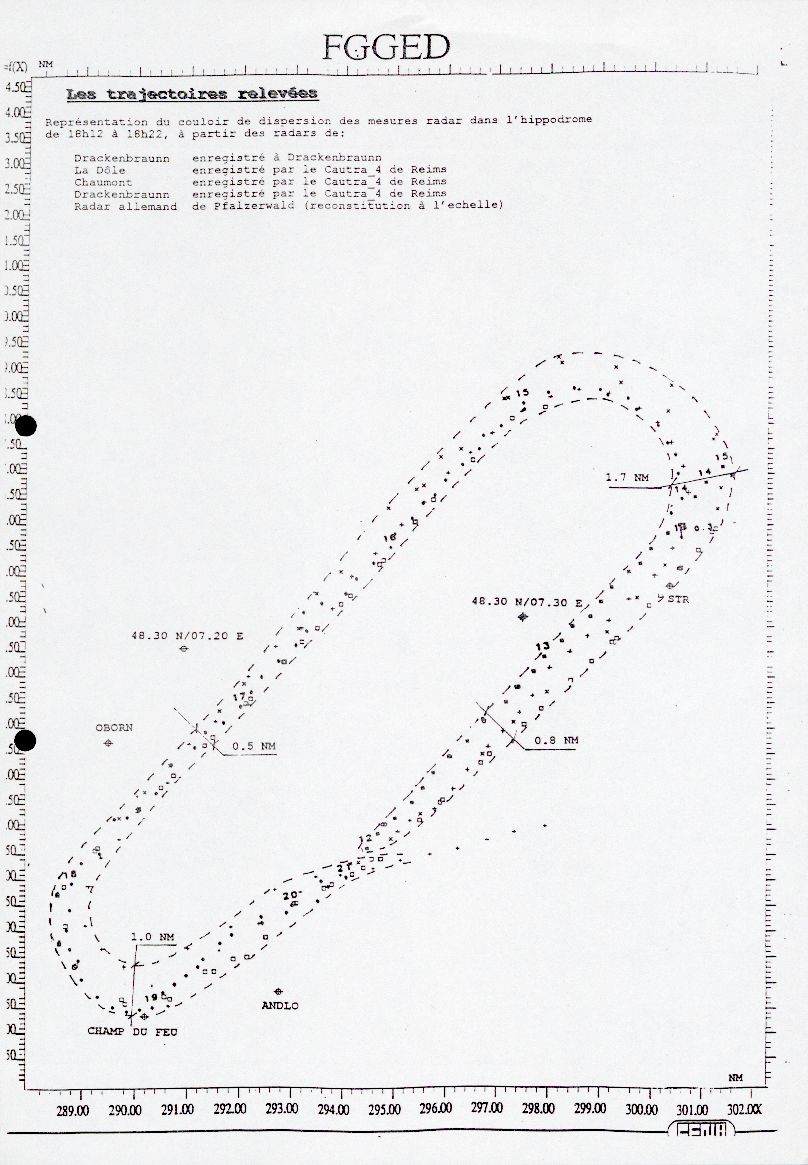
| a11-1-4.htm | Appenix 11: Trajectorgraphic radar informations and additional notes |
| a11-5.jpg | Appenix 11: Trajectorgraphic radar informations and additional notes |
| a11-6-8.htm | Appenix 11: Trajectorgraphic radar informations and additional notes |
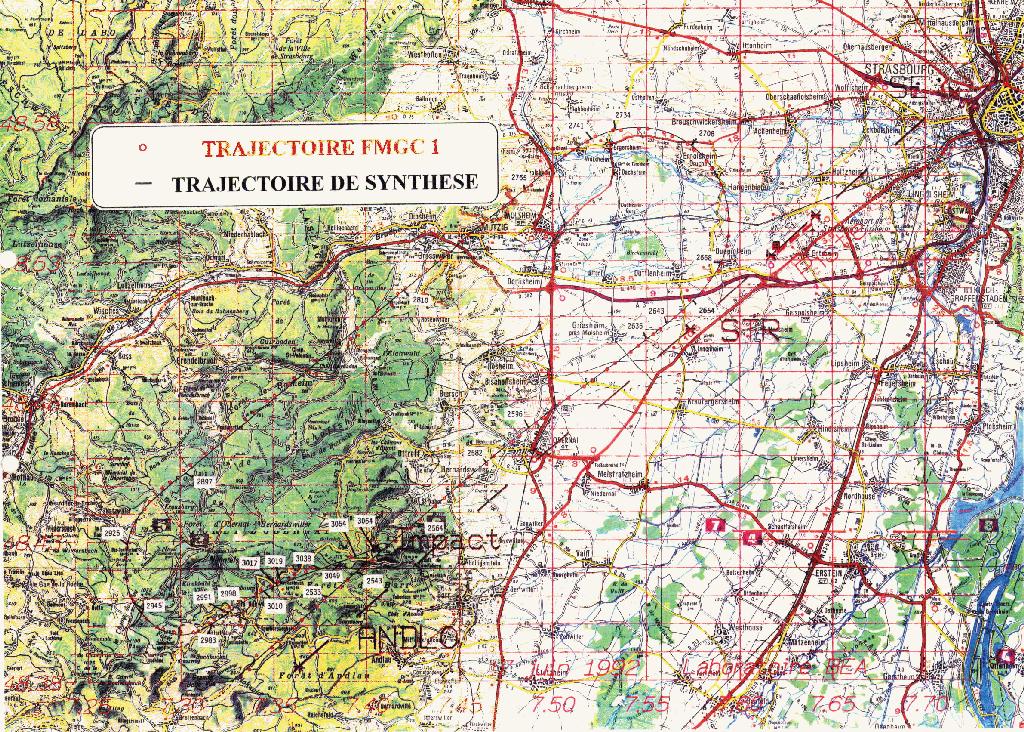
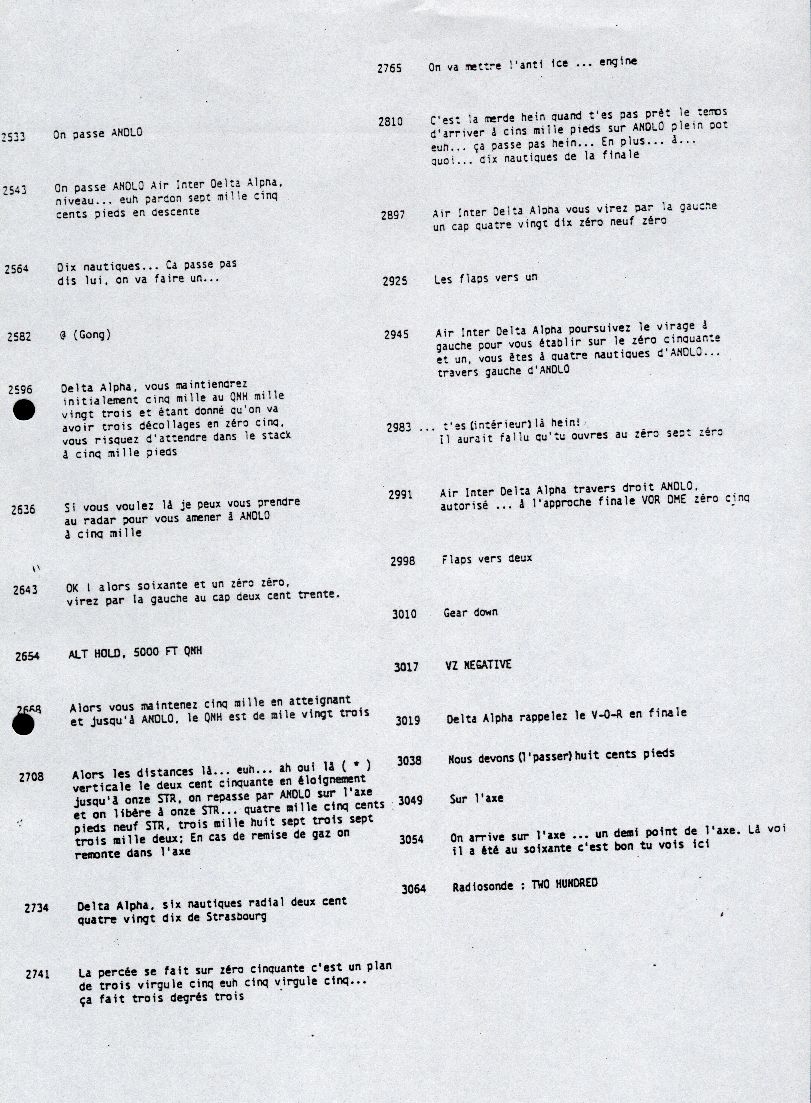
| a12-1.jpg | Appenix 12: Trajector FMGC1 and trajector synthesis |
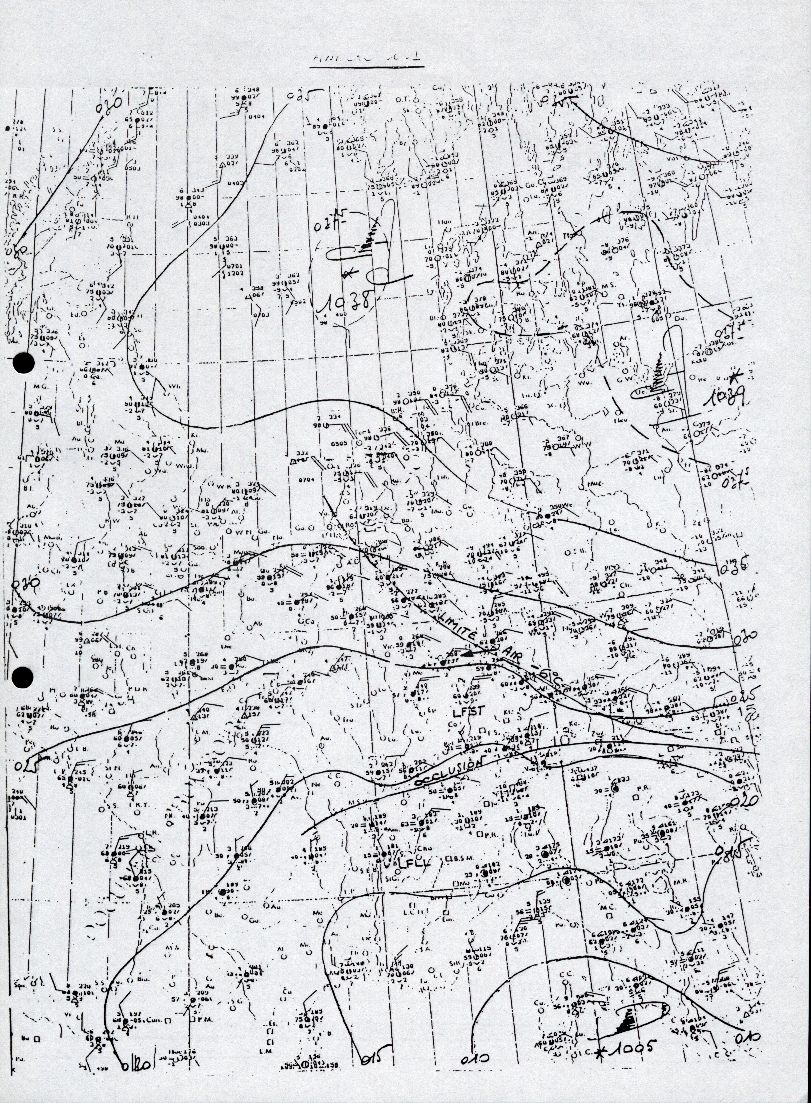
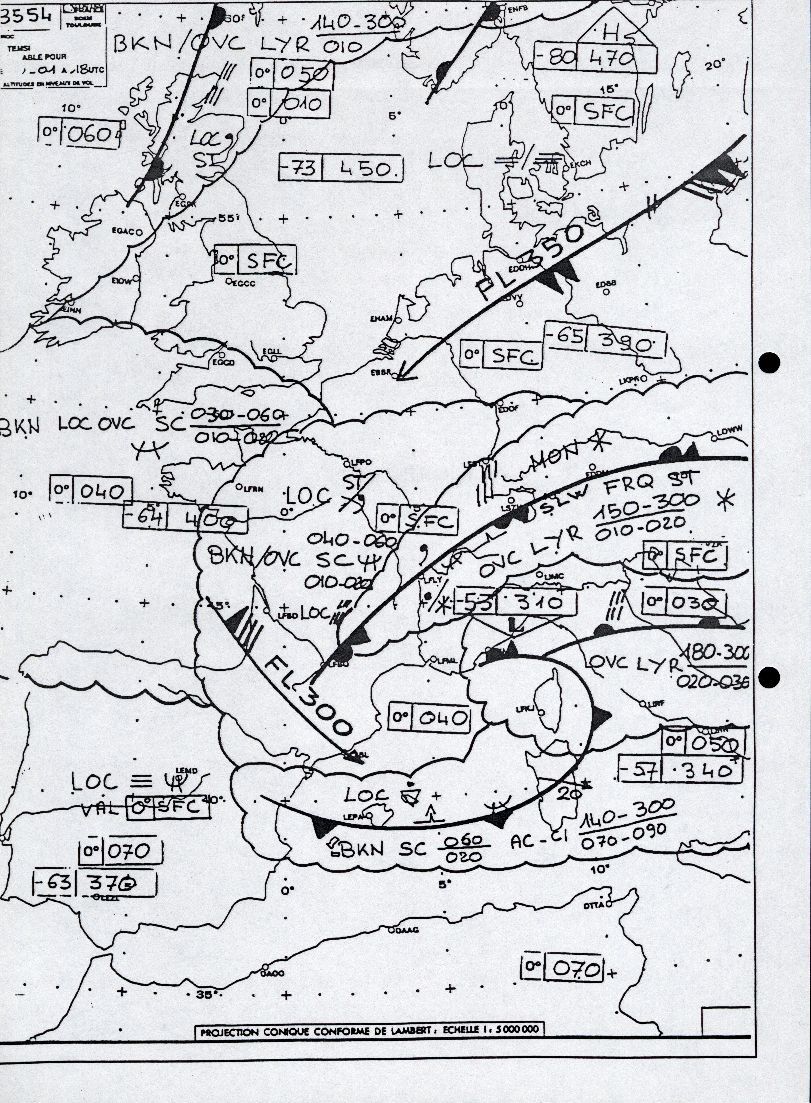
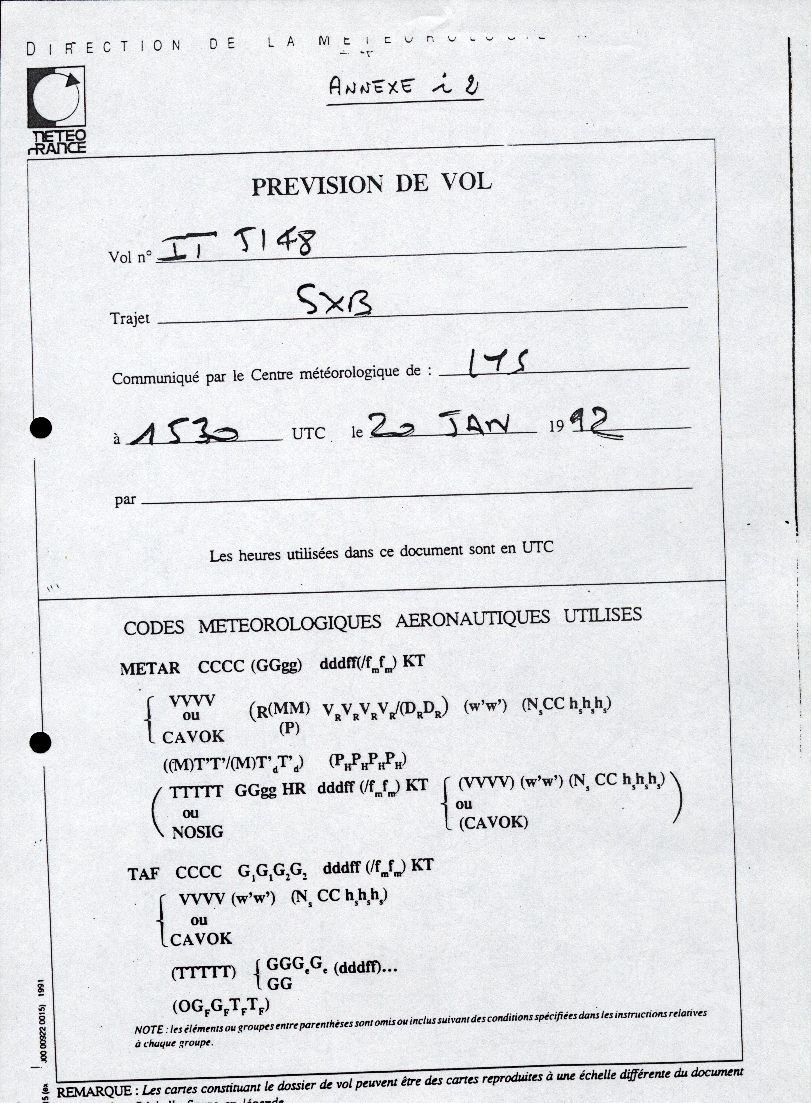
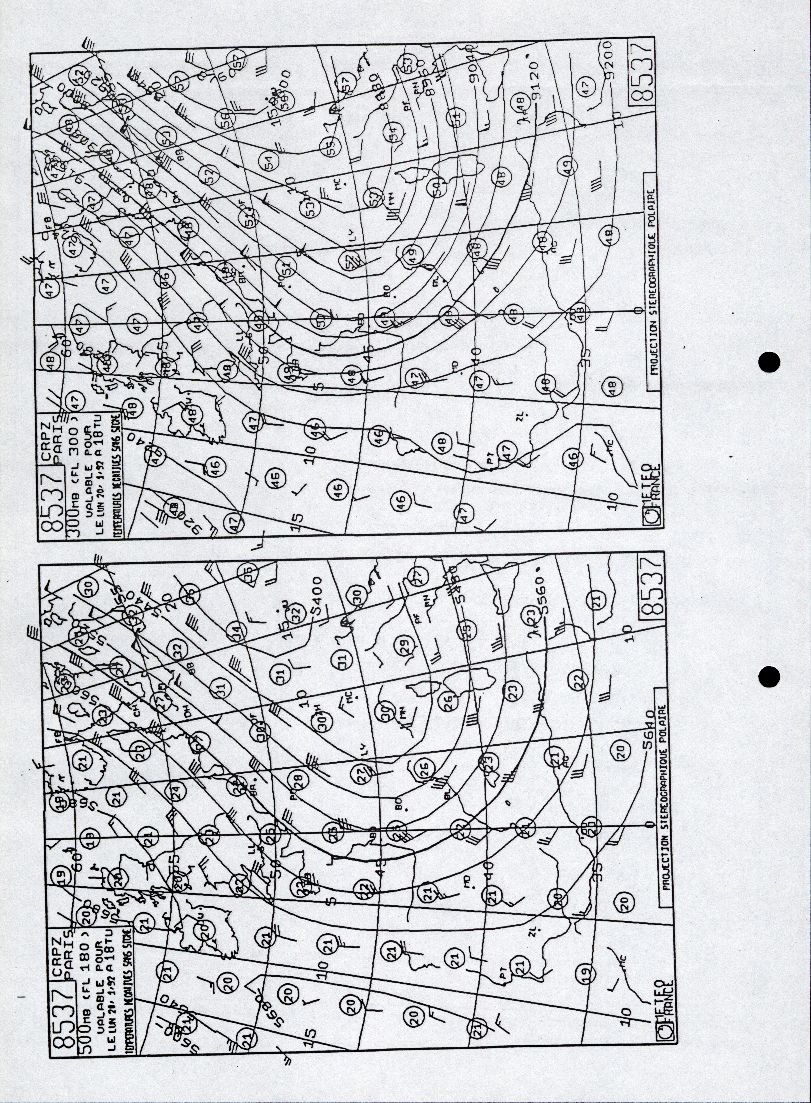
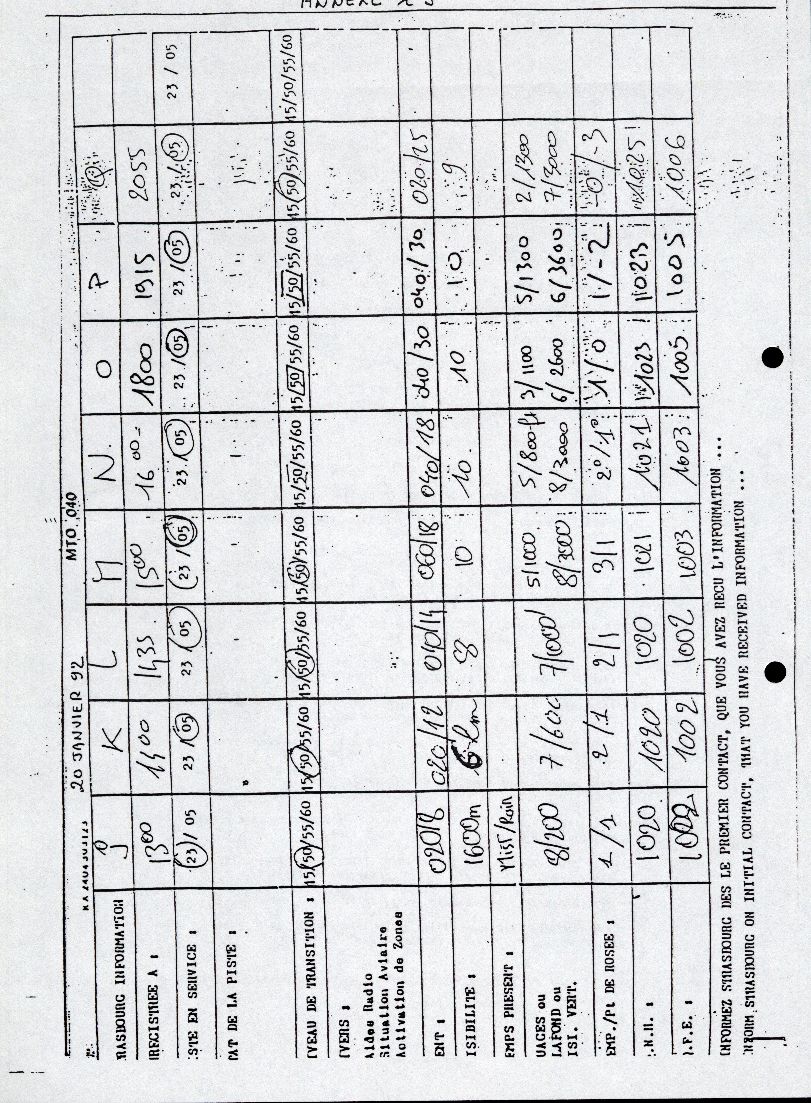
| a13-1.jpg | Appenix 13: Meterologic dossier |
| a13-2.jpg | Appenix 13: Meterologic dossier |
| a13-3.jpg | Appenix 13: Meterologic dossier |
| a13-4.jpg | Appenix 13: Meterologic dossier |
| a13-5.jpg | Appenix 13: Meterologic dossier |
| a13-6.jpg | Appenix 13: Meterologic dossier |
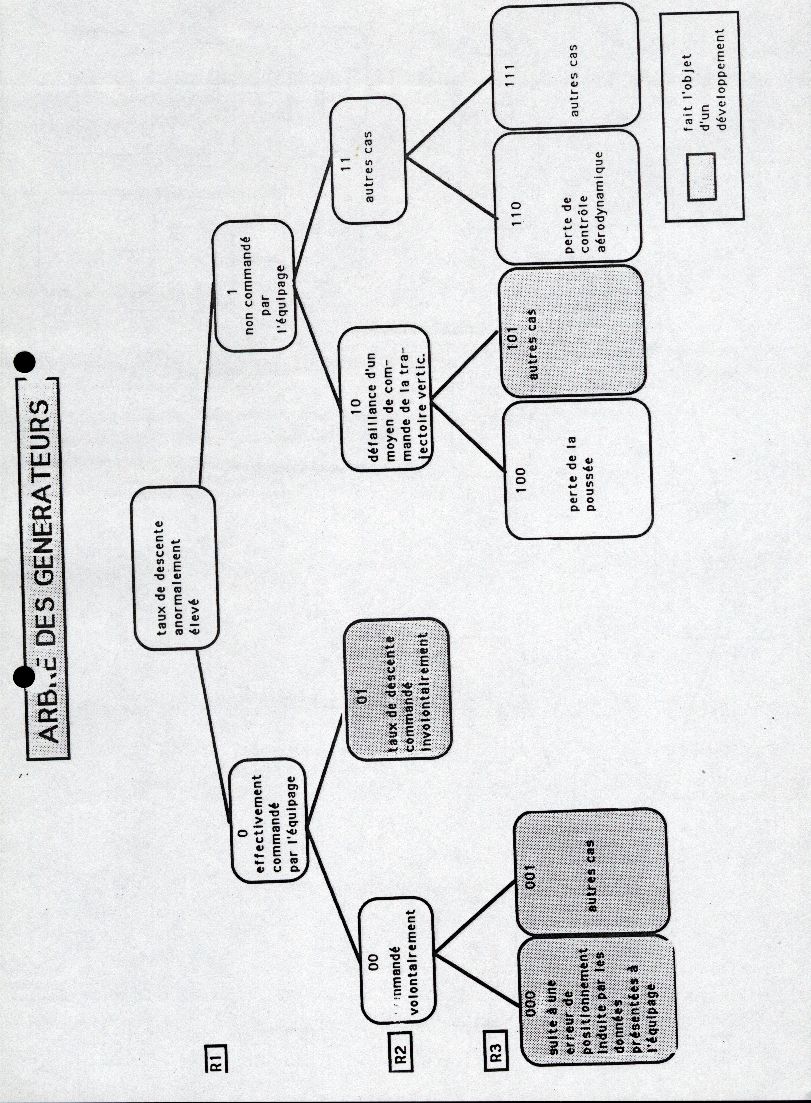
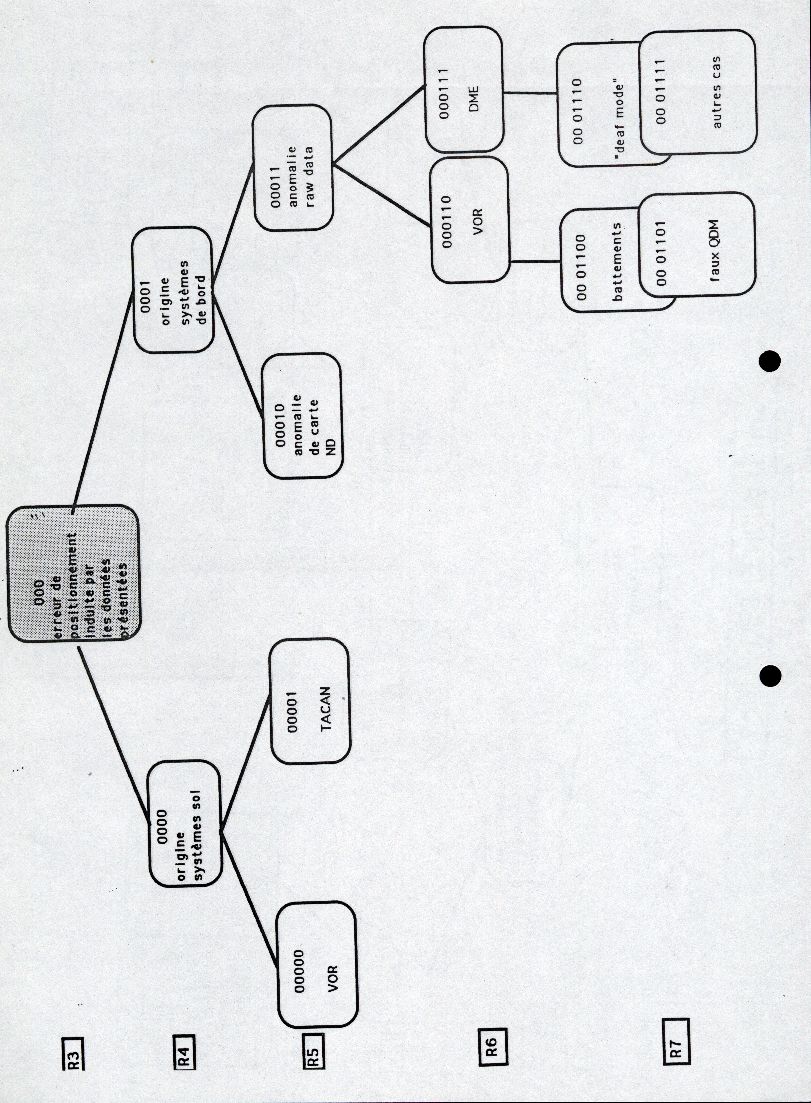
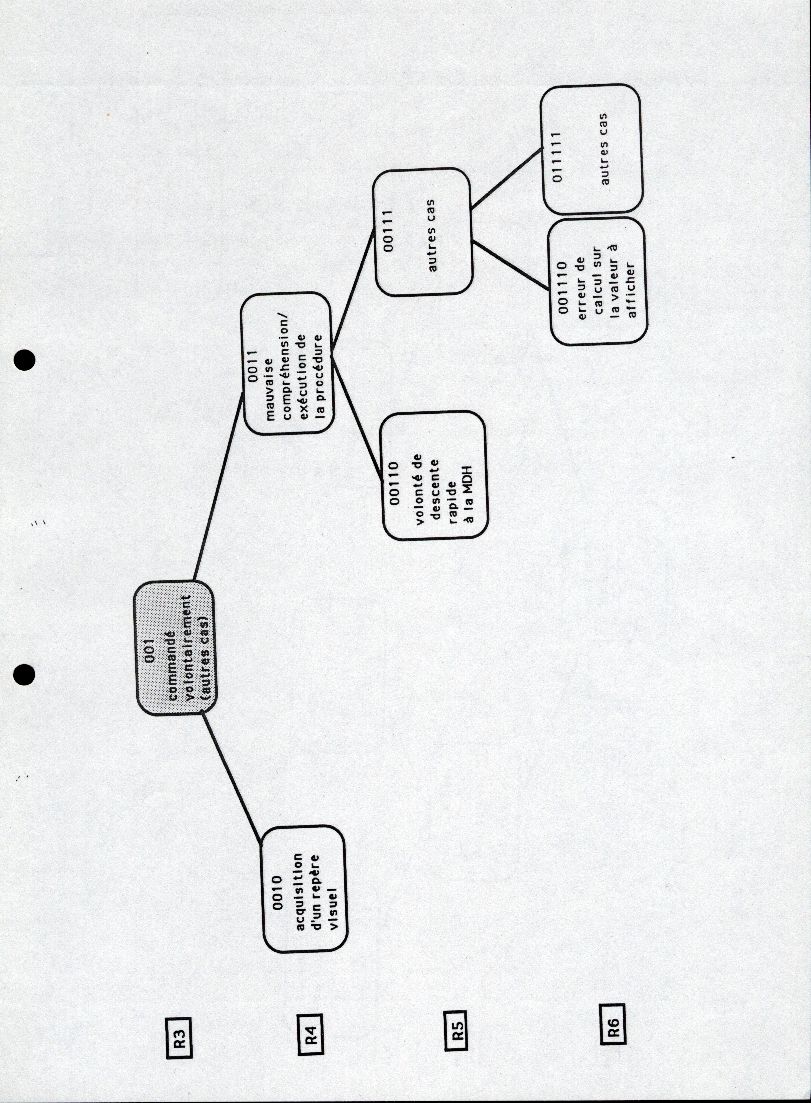
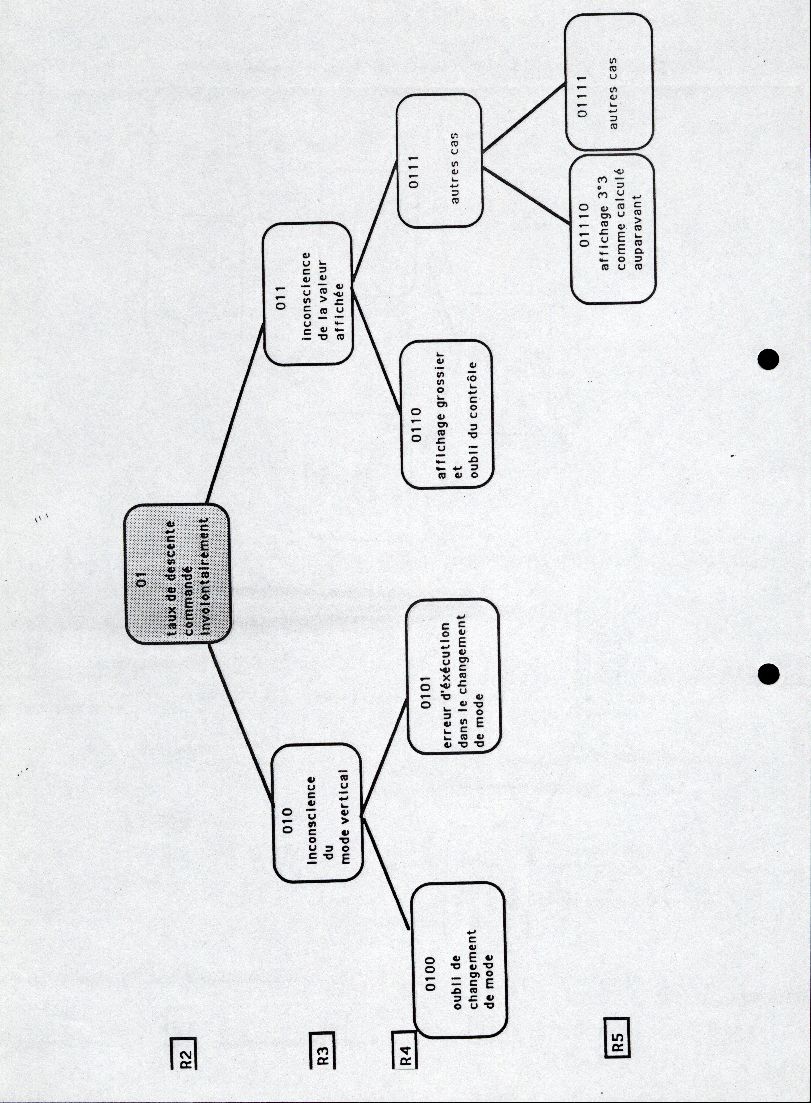
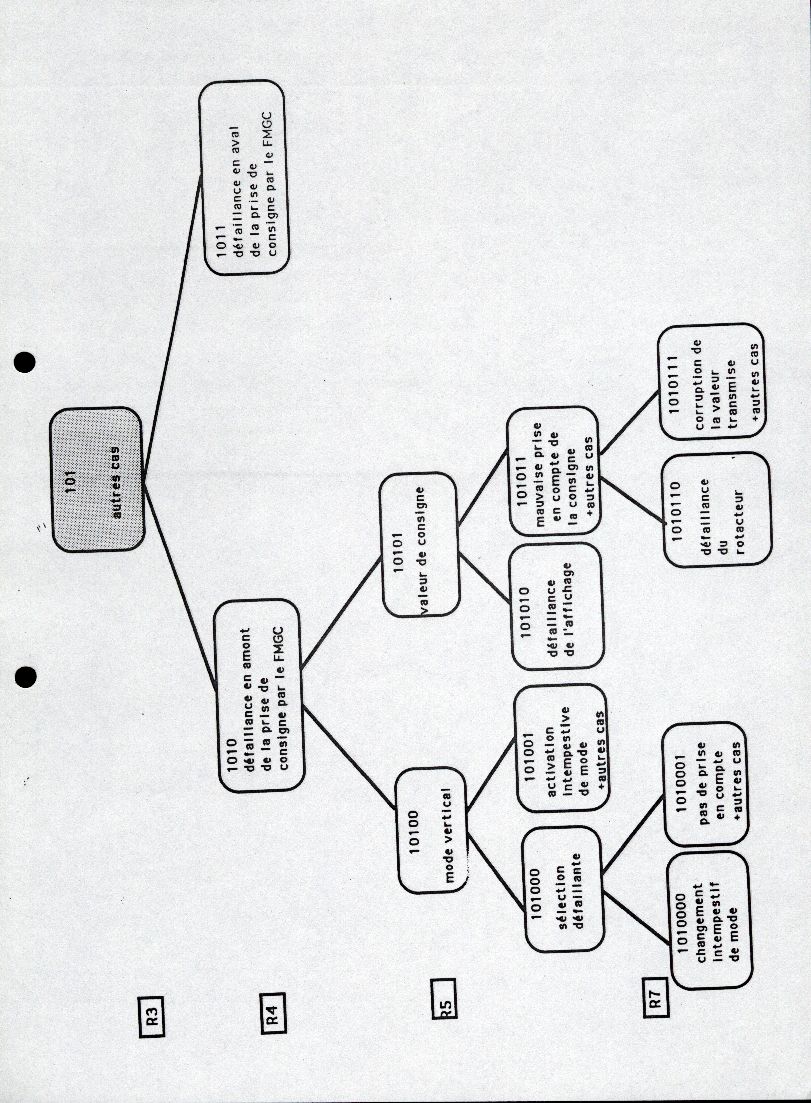
| a14-1.jpg | Appenix 14: Potential Fault-Tree of the accident |
| a14-2.jpg | Appenix 14: Potential Fault-Tree of the accident |
| a14-3.jpg | Appenix 14: Potential Fault-Tree of the accident |
| a14-4.jpg | Appenix 14: Potential Fault-Tree of the accident |
| a14-5.jpg | Appenix 14: Potential Fault-Tree of the accident |
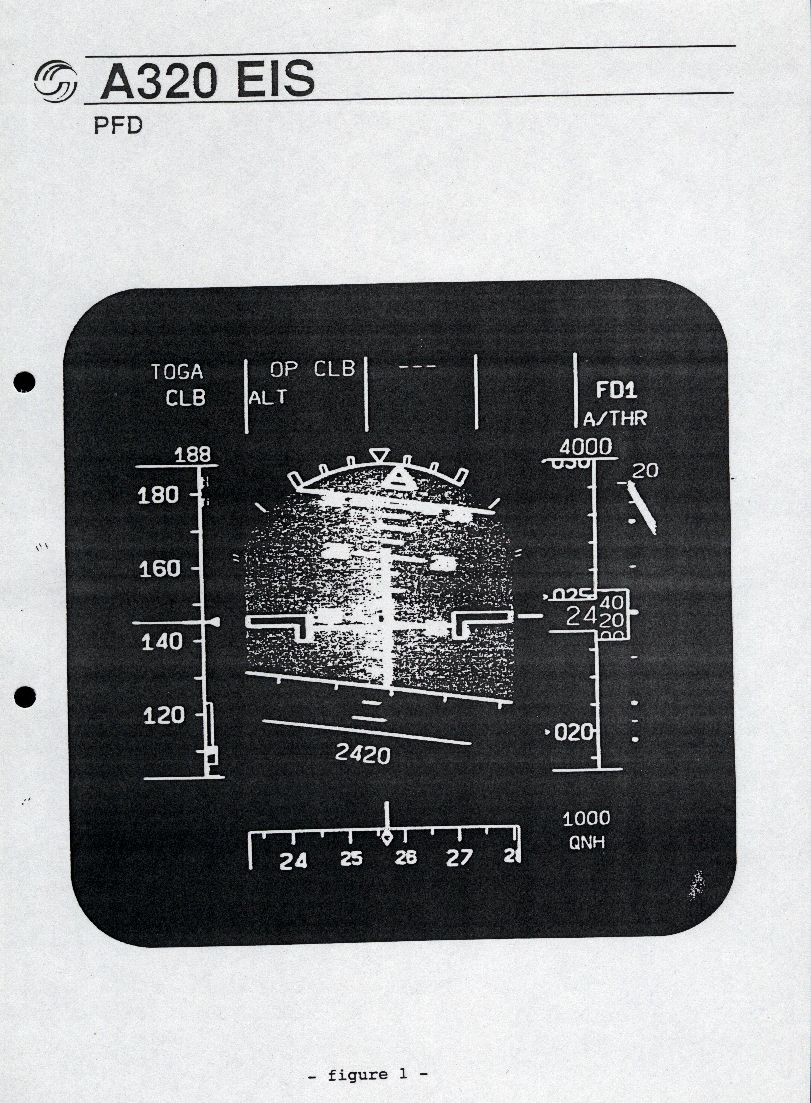
| a15-1.htm | Appenix 15: Description of the flight and navigation systems of the A320 |
| a15-2.jpg | Appenix 15: Description of the flight and navigation systems of the A320 |
| a15-3.jpg | Appenix 15: Description of the flight and navigation systems of the A320 |
| a15-4.jpg | Appenix 15: Description of the flight and navigation systems of the A320 |
| a15-5.jpg | Appenix 15: Description of the flight and navigation systems of the A320 |
| a15-6.htm | Appenix 15: Description of the flight and navigation systems of the A320 |
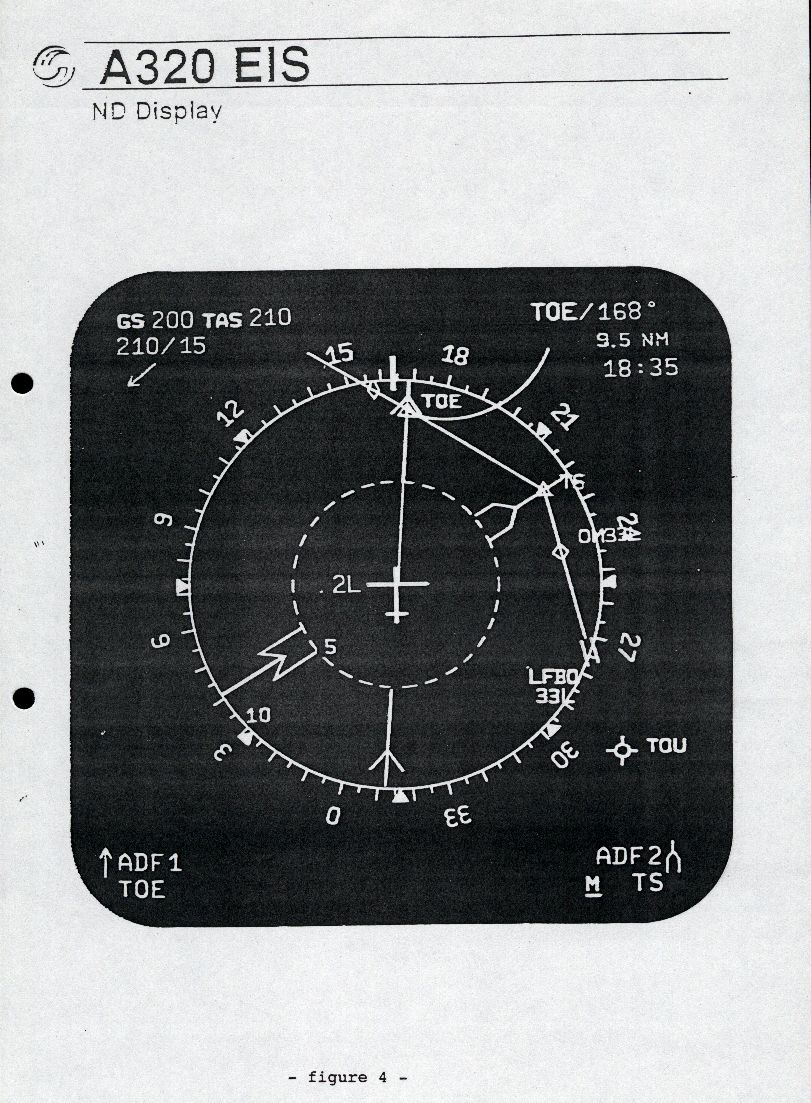
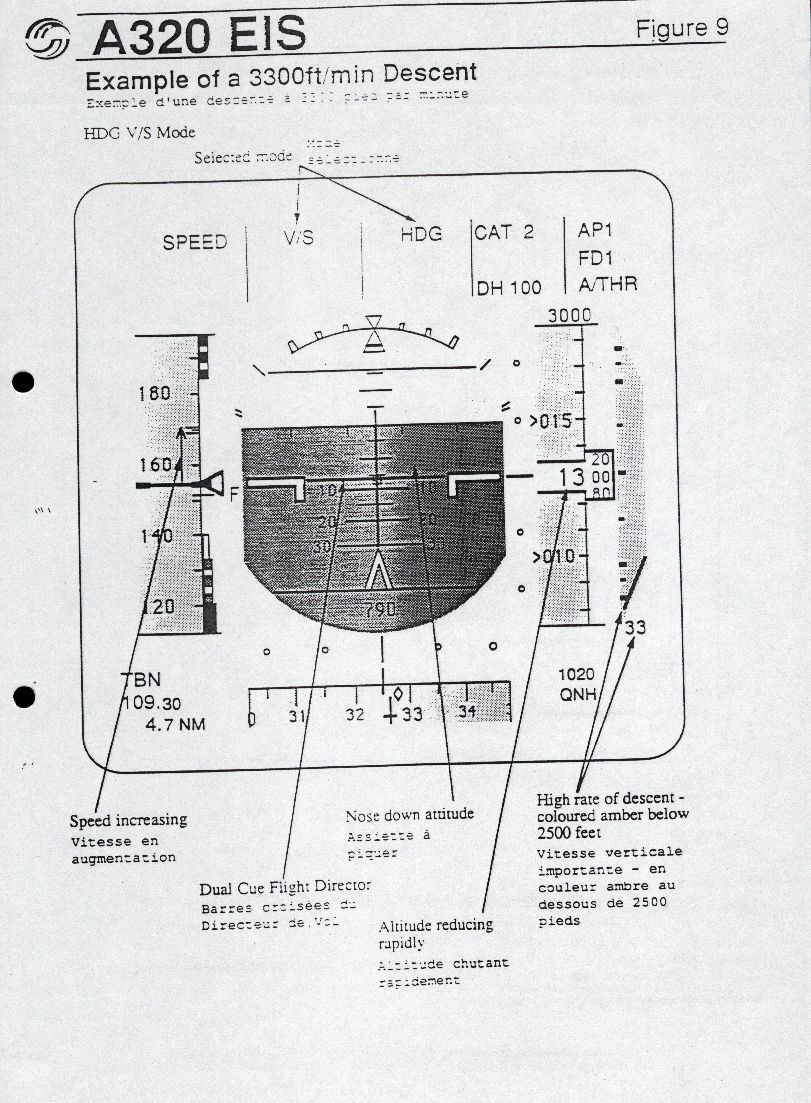
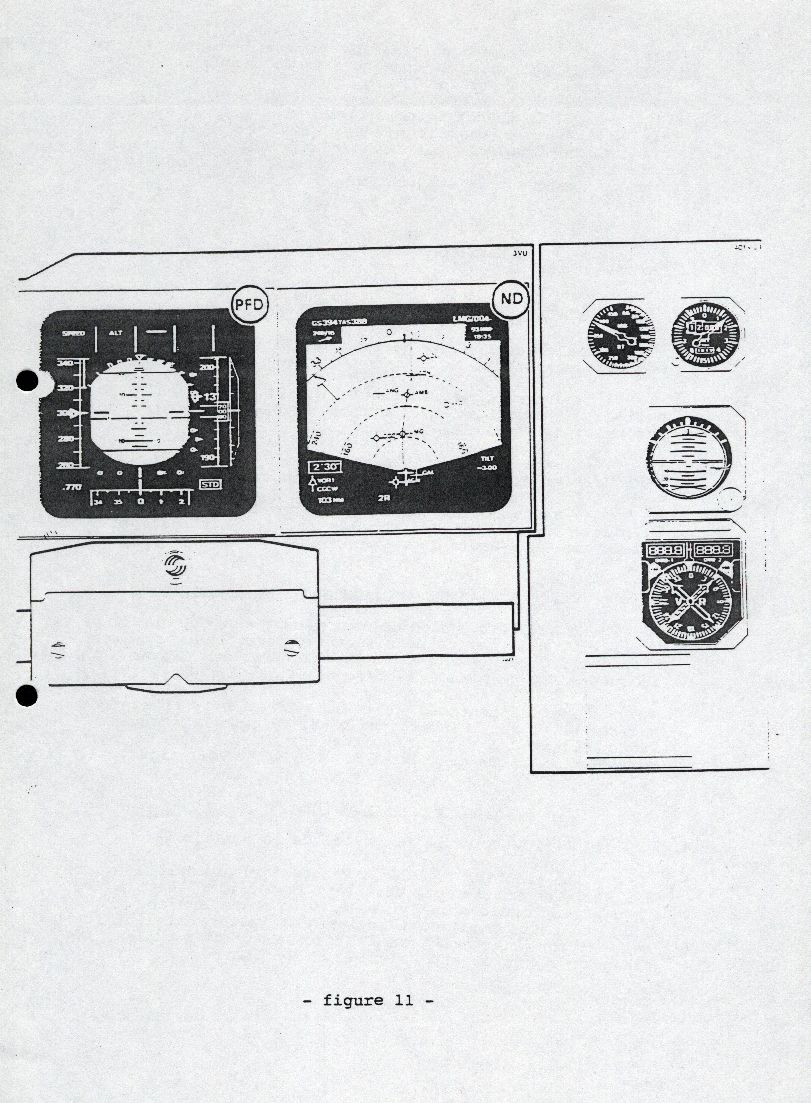
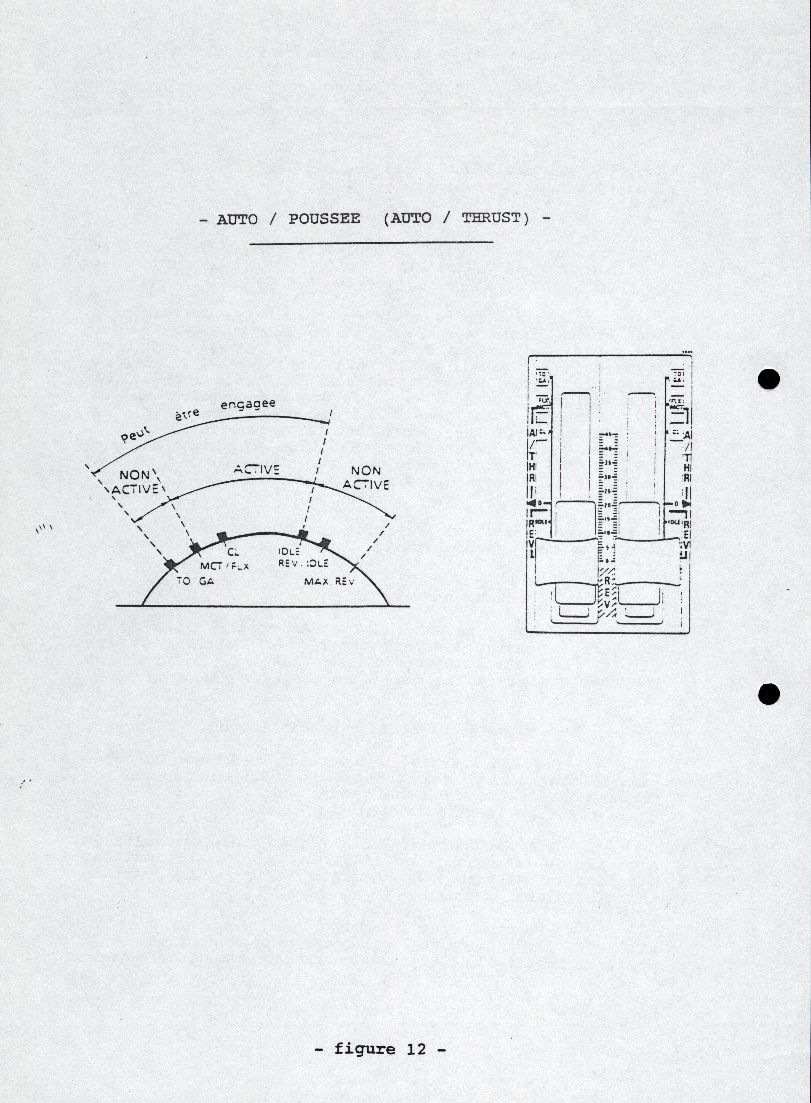
| a15-7.jpg | Appenix 15: Description of the flight and navigation systems of the A320 |
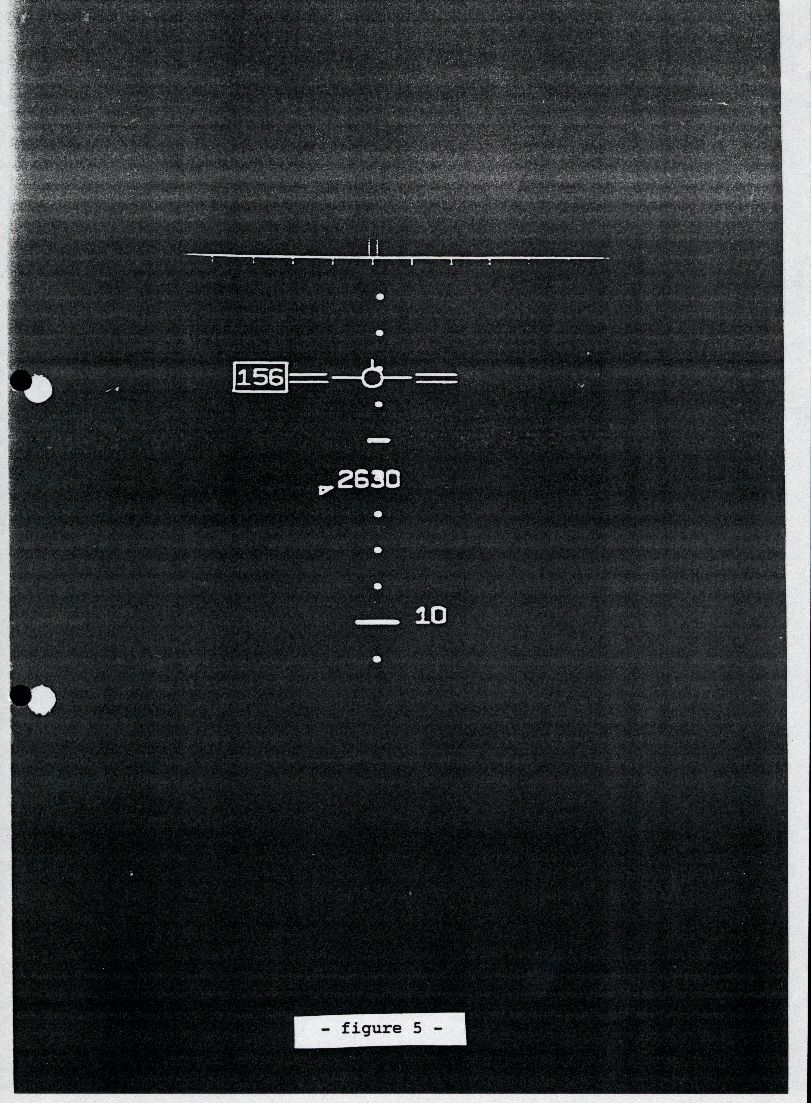
| a15-8.jpg | Appenix 15: Description of the flight and navigation systems of the A320 |
| a15-9.htm | Appenix 15: Description of the flight and navigation systems of the A320 |
| a15-10-11.htm | Appenix 15: Description of the flight and navigation systems of the A320 |
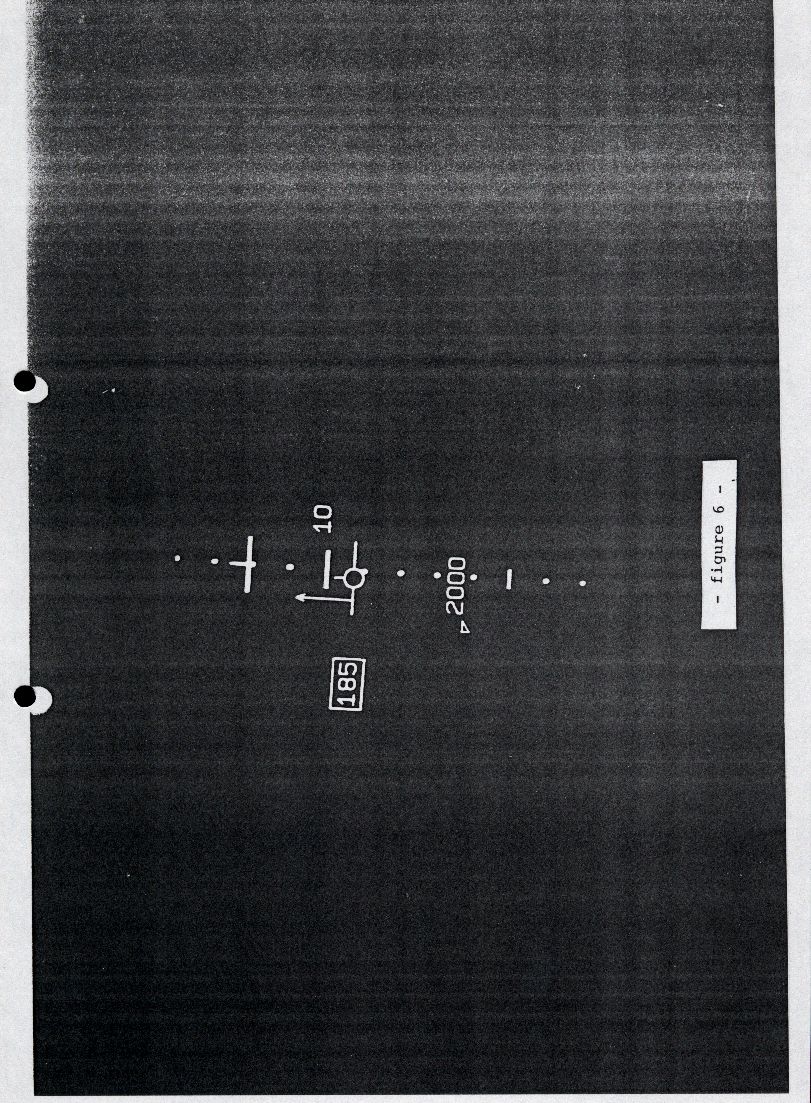
| a15-12.jpg | Appenix 15: Description of the flight and navigation systems of the A320 |
| a15-13.htm | Appenix 15: Description of the flight and navigation systems of the A320 |
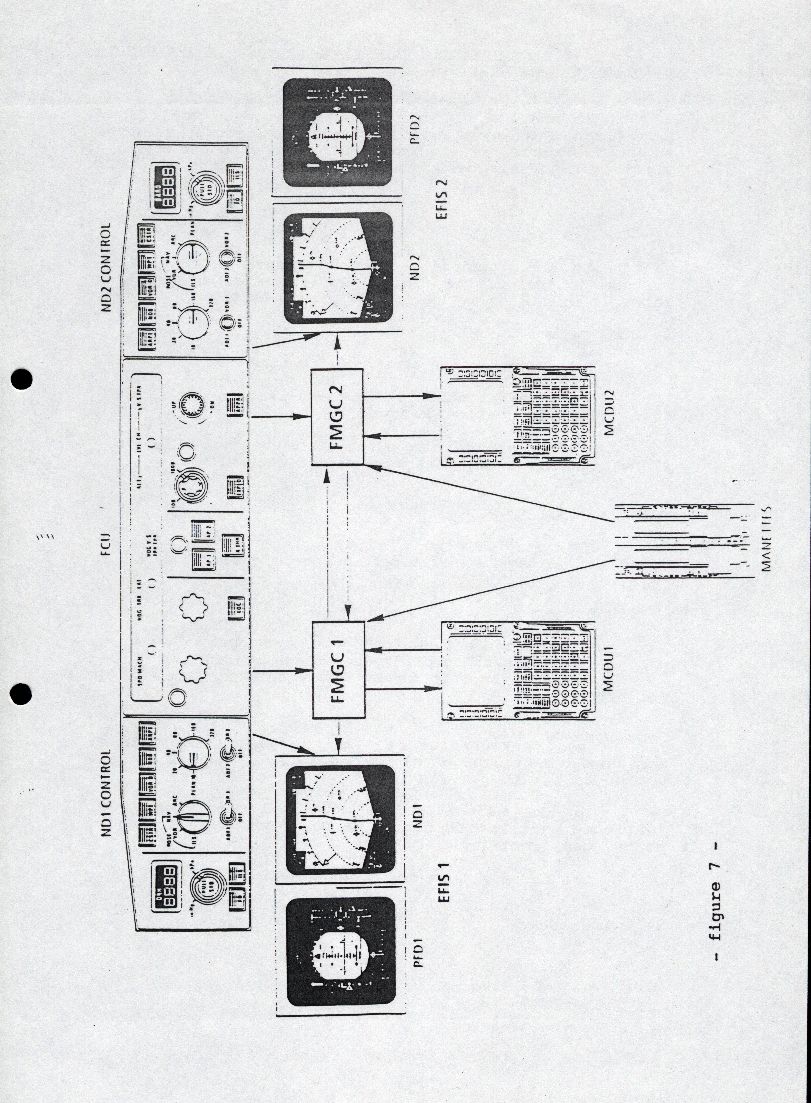
| a15-14.jpg | Appenix 15: Description of the flight and navigation systems of the A320 |
| a15-15-17.htm | Appenix 15: Description of the flight and navigation systems of the A320 |
| a15-18.jpg | Appenix 15: Description of the flight and navigation systems of the A320 |
| a15-19.jpg | Appenix 15: Description of the flight and navigation systems of the A320 |
| a15-20.jpg | Appenix 15: Description of the flight and navigation systems of the A320 |
| a15-21-22.htm | Appenix 15: Description of the flight and navigation systems of the A320 |
| a15-23.jpg | Appenix 15: Description of the flight and navigation systems of the A320 |
| a15-24-25.htm | Appenix 15: Description of the flight and navigation systems of the A320 |
| Sorry | Appenix 16: Some Photos of the A320 -should be digitised (bad copy) |
| Peter B. Ladkin, 1999-02-08 | |
|
|
by Michael Blume |